Why YAML Matters in dbt
Building on this foundation, dbt YAML is the connective tissue that turns SQL models into an operational, testable analytics product. If your repo has many models but inconsistent metadata, you’ll struggle to trust outputs and onboard new teammates. Using dbt YAML early forces a contract-first mindset: you declare schema expectations, descriptions, and tests alongside your models so the codebase communicates intent, not just behavior.
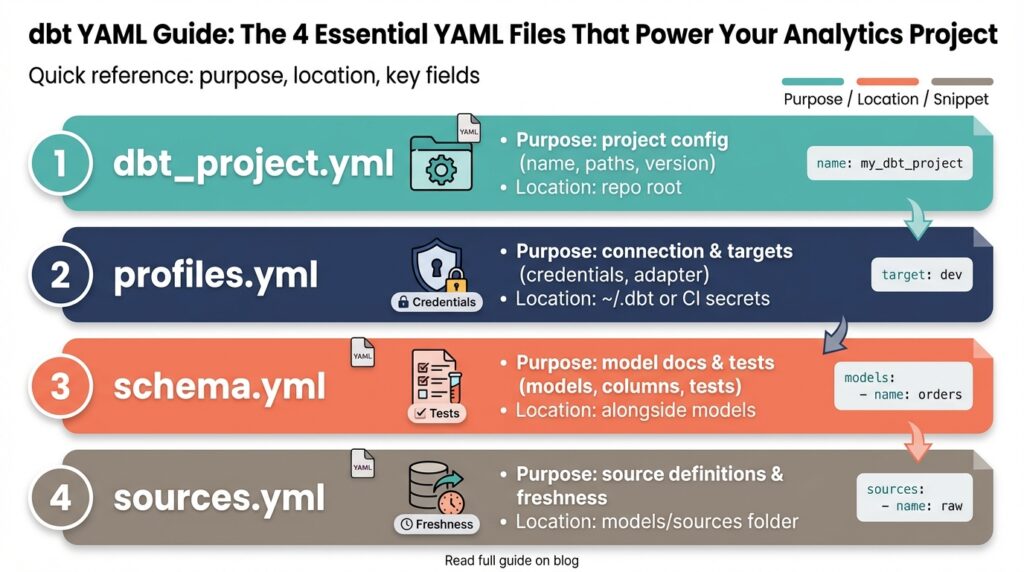
YAML files in dbt centralize metadata, tests, and configuration in predictable locations instead of scattering them across ad-hoc SQL comments or external docs. This centralization makes model contracts machine-readable: the same YAML drives automated tests, the docs site, and the manifest dbt produces for dependency resolution. When you define a column-level test or a source freshness check in YAML, you make those guarantees executable—CI can run them, and alerts can be wired directly to failing assertions.
For example, a minimal model declaration in schema.yml declares intent and validation in one place:
models:
  - name: orders
    description: "Normalized orders, one row per order with derived status"
    columns:
      - name: order_id
        tests: [unique, not_null]
      - name: total_amount
        tests: [not_null]
This pattern reduces cognitive load during reviews: when you open a model, you immediately see its description and which properties must hold in production. The test names are explicit and map directly to dbt’s test suite, so running dbt test enforces the contract you documented.
We rely on YAML to enable reproducible deployments and prevent schema drift. When config lives in YAML rather than scattered model-level pragmas, merging schema changes becomes reviewable and auditable. CI pipelines can apply migrations only after tests described in YAML pass, and rollbacks are safer because the declared expectations are versioned with the repository. That predictability matters in analytics environments where downstream reports and dashboards depend on stable column semantics.
YAML also gives us extensibility: you can attach owners, exposure definitions, tags, and custom metadata that your orchestration or observability tooling can consume. Use YAML-level config when you want to apply settings across resource sets or to surface ownership for on-call rotations. Conversely, prefer model-level config inside SQL when a behavior is local and unlikely to be shared; choose the YAML approach when consistency and discoverability matter across the project.
How do you make the most of YAML in day-to-day workflows? Treat YAML as part of your code review checklist: require descriptions for public-facing models, mandate tests for financial columns, and validate source freshness thresholds in pull requests. Doing so turns YAML into an operational contract that integrates with monitoring, lineage tools, and runbooks; when a test fails, the manifest and YAML metadata point you toward the responsible team and the exact business rule that broke.
Taking this concept further, you can leverage YAML to scale governance without blocking velocity. Define conventions and templates for schema.yml files, enforce them with linting in pre-commit hooks, and extend metadata to annotate SLAs or downstream consumers. In the next section we’ll examine the specific YAML files that embody these practices and show concrete patterns you can adopt immediately, so your dbt project becomes both a single source of truth and an executable analytics system.
dbt_project.yml — Project Config
When a repo grows beyond a handful of models, the single source of truth for runtime behavior becomes critical—dbt_project.yml is where you codify that truth. This file defines project config that controls defaults, resource paths, and runtime hooks so your CI, docs site, and team conventions all behave predictably. How do you keep runtime defaults, folder-level configs, and cross-resource hooks consistent across environments? We use dbt_project.yml to declare those contracts centrally instead of scattering settings across SQL files or ad-hoc scripts.
Start by thinking of dbt_project.yml as the project-wide configuration layer that complements profiles.yml (which contains connection details). At a minimum you declare the project name, version, and the primary folders dbt should scan (models-paths, analysis-paths, macros-paths, data-paths, seeds-paths). Below is a compact example that demonstrates these essentials and shows how readable YAML maps to runtime behavior:
name: analytics
version: 1.0.0
profile: analytics_prod
config-version: 2
model-paths: ["models"]
seed-paths: ["data"]
One of the most powerful patterns is applying model-level defaults at the directory level inside this project config. Instead of repeating materialization, tags, or column-level settings in dozens of .sql files, define a models: block that targets folders or packages and sets defaults like materialized: view, tags: [finance], or +persist_docs. This is where you express “apply this behavior to everything under models/staging” so reviewers and CI see a consistent contract up front. Use path selectors and package-qualified names to scope config precisely; reserve SQL-level config when you need one-off overrides.
Beyond models you should use dbt_project.yml to declare paths and resource discovery rules so build systems and documentation generators align. Set package-paths for local packages or plugins, macro-paths for shared helper functions, and source-paths when you want dbt to source external YAML for inbound tables. You can also declare snapshots and seed settings here (e.g., CSV parsing options) so automated runs treat these artifacts consistently across environments and prevent subtle drift between local dev and scheduled runs.
Project variables, hooks, and on-run actions belong in this file when they represent project-wide policies rather than environment secrets. Declare vars that tests or macros will read, and use on-run-start / on-run-end hooks for common housekeeping—audit logging, metrics emission, or lineage extraction—rather than embedding those calls in every job. For environment-specific changes, keep credentials in profiles.yml and toggle behavior via vars or by combining dbt_project.yml with CI-time overrides, which preserves auditability while enabling deployment differences.
Treat dbt_project.yml as both documentation and enforcement. Front-load the file with clear, versioned defaults so reviewers immediately see the intended materializations, testing strategy, and ownership conventions for each folder. That makes pull requests easier to validate: when a model changes, the manifest plus project config tell you how it will run and which tests will exercise it. In the next section we’ll take the same contract-first mindset down to schema-level YAML so tests, column descriptions, and ownership live alongside the models that consume them.
profiles.yml — Connections & Targets
Profiles.yml is the single place where dbt maps your repository to actual databases, so getting profiles.yml, connections, and targets right is essential for reliable deployments and safe credential handling. In the first 100 words: profiles.yml defines which database adapter to use, the connection parameters (host, user, database, role), and one or more named targets that represent runtime environments such as dev, staging, and prod. How do you safely manage credentials across dev, staging, and production? We’ll cover patterns for environment-specific targets, secret management, and operational guards you can apply in CI and orchestration.
Start by treating the profile as a mapping layer rather than an application config file. A dbt profile (the logical object referenced by dbt_project.yml) contains connection settings plus a default target name; the target selects a concrete connection when you run dbt. For example, a minimal target block points to adapter-specific keys and often references environment variables for secrets:
yaml
my_profile:
  target: dev
  outputs:
    dev:
      type: snowflake
      account: "${SNOWFLAKE_ACCOUNT}"
      user: "${SNOWFLAKE_USER}"
      password: "${SNOWFLAKE_PASSWORD}"
      role: ANALYST
This pattern keeps secrets out of source control while making the mapping from repo to database explicit.
Use multiple targets to model lifecycle stages and to control privileges at runtime. Define targets like dev, ci, and prod where dev uses a developer role and prod uses a restricted, audited service account; CI runs against a dedicated ci target with ephemeral credentials. For cloud warehouses you’ll also see targets that vary by warehouse/compute size or by role (for example, prod_readonly). Keep each target focused: specify connection pools, threads, and any adapter-specific settings so when you switch targets you predictably change only the intended knobs.
Protecting credentials and limiting blast radius are practical concerns you must address before scaling. Never check plaintext passwords into profiles.yml; instead reference environment variables or an injected file created at runtime by your CI agent or secret manager. In CI or Airflow/Orchestrator jobs, inject the correct target via the DBT_TARGET environment variable and source credentials from a vault, cloud secret manager, or ephemeral token service. Enforce role separation by using low-privilege service accounts for scheduled runs and interactive developer targets for local work—this reduces production risk if a token is leaked.
For advanced architectures, model multi-warehouse and cross-account setups inside the profile rather than scattered runtime scripts. If you run Snowflake with role-based access control, place role and warehouse overrides inside named targets and let teams select a target that fits their SLA. If you use BigQuery, use impersonation targets or distinct service accounts per environment to audit queries by team. When should you create multiple profiles instead of multiple targets? Use multiple profiles when a team must maintain entirely separate credential sets and lifecycle policies (for example, a vendor-managed analytics workspace), and prefer multiple targets when the environments share governance and are simply different runtime configurations.
Building on the project-level defaults we discussed earlier, use profiles.yml to codify runtime intent—who can run what where and with which privileges. That makes dbt_project.yml and profiles.yml complementary: project config dictates behavior and discovery, while the profile enforces runtime connections and security boundaries. Next we’ll translate these connection and target patterns into CI job templates and runbook checks so your pipelines select the right target automatically and your manifest reflects the actual environment used in production.
properties.yml — Model Properties
Building on this foundation, the model-level YAML is the single place you declare intended behavior, documentation, and validation for each model so reviewers and CI know what to expect before a job runs. If you’ve ever opened a model and hunted for its business rules, you know why model properties and clear column descriptions matter: they turn implicit assumptions into executable contracts. How do you decide which properties belong in this YAML versus inline model config? We’ll walk through the practical patterns that keep metadata, tests, and ownership discoverable and enforceable across your project.
Start with the minimal structure: a model identifier, a concise description, and a columns block where you declare column descriptions and tests. This block is the canonical source for column-level expectations, so prefer the YAML when the rule is part of the model’s public contract rather than a one-off implementation detail. For example, declare tests: [unique, not_null] and attach meta like owner or sla directly under the column so tooling can surface responsible teams and alerting thresholds. These model properties drive the docs site and dbt test runs, turning human-readable descriptions into machine-readable checks.
Use metadata fields to bridge engineering and operations: tags, meta, and docs let you attach routing, on-call, and SLA information to a model without changing SQL. Tag models with business domains (for instance, finance or marketing) so orchestration tools and dashboards can filter lineage and alerting by owner. Put operational keys into meta — e.g., meta: {owner: "data-team-x", runbook: "https://...", severity: high} — and your observability pipeline can map test failures to the right team automatically. This approach reduces cognitive load during incident response because the manifest points at the intended owner and the documented business rule.
Tests and custom assertions belong in YAML when they represent recurring, reviewable rules across environments. Standard tests like not_null, unique, and accepted_values are easy to declare on columns; custom tests (macros) can also be referenced here so CI enforces domain-specific invariants. By centralizing tests in the properties file, you separate validation from implementation and make schema changes reviewable: PRs that change a column’s description or tests are auditable and can trigger CI gates. This pattern prevents schema drift and keeps downstream dashboards from breaking silently.
There are trade-offs: use inline SQL config (model-level config() in the .sql file) for one-off materialization or performance tweaks that are tightly coupled to implementation, and use the YAML properties file for discoverability, governance, and documentation. In practice, we declare business rules, column descriptions, tests, tags, and ownership in YAML and keep runtime knobs like cluster_by or distkey inside model SQL when they require tight coupling to the query. That separation preserves clarity during reviews: structural and contractual changes surface in YAML, while performance experiments remain local to the SQL.
Here’s a short YAML pattern you can adapt as a template:
models:
  - name: orders
    description: "One row per order with normalized status and marketplace attribution"
    tags: [finance, canonical]
    meta: { owner: "payments-team", sla: "24h" }
    columns:
      - name: order_id
        description: "Primary order identifier"
        tests: [unique, not_null]
      - name: total_amount
        description: "Order total in account currency"
        tests: [not_null]
Treat the properties file as living documentation and enforce it with automation: lint on missing descriptions, require tests for monetary or KPI columns, and surface meta.owner in your alerting runbooks. When you adopt these conventions, the manifest becomes an operational contract that drives docs, tests, and incident routing. Taking this approach lets us scale governance without slowing development—next, we’ll apply the same contract-first mindset to exposure definitions and cross-model lineage so consumers can trust and rely on published datasets.
sources.yml — Define Data Sources
Building on this foundation, the first thing to do is declare the inputs to your analytics pipeline so everyone — and every automated check — knows what you depend on. Use dbt YAML to describe those data sources as contractual artifacts: a clear name, the physical schema or dataset, table names, and a short description that explains business intent. This upfront declaration reduces ambiguity during reviews and enables downstream tooling to map lineage, tests, and alerts back to the original producer of truth for each dataset.
Start with the canonical structure for a source: a top-level sources: block that contains one or more source entries, each with a logical name, database/schema mapping, and a tables list. In the tables you declare descriptions, column metadata, tests, and freshness rules (freshness = how recently the upstream data should have been updated). For example, a compact pattern looks like this:
sources:
  - name: raw_events
    database: analytics_prod
    schema: raw
    tables:
      - name: events
        description: "Event stream ingested from tracking pipeline"
        freshness:
          warn_after: {count: 2, period: hour}
          error_after: {count: 6, period: hour}
        columns:
          - name: event_id
            description: "Unique tracking id"
            tests: [not_null, unique]
Why add tests and freshness here instead of on models? Because tests attached to your data sources validate the contract at ingress: they answer the question, “How do you ensure upstream changes don’t silently break downstream models?” Freshness checks are especially useful for streaming or frequently-updated tables; they let CI and orchestration fail fast when the source pipeline stalls. Keep expensive or implementation-specific assertions on models, but put public-contract checks and freshness on sources to guard the entire dependency graph.
Metadata fields like description, tags, and meta are critical for operationalizing ownership and SLAs. Put an owner, runbook link, and severity in meta so your alerting and incident routing can programmatically map a failing test to a responsible team. For example, meta: {owner: “ingest-team”, runbook: “/runbooks/events”} lets on-call playbooks surface the right runbook in alerts. Tags allow quick filtering on the docs site and in downstream orchestration; use consistent tag taxonomy (for instance, source_type:stream or domain:marketing) so automation can act on those labels.
In practice, reference sources from models using the source() macro to preserve lineage and make intent explicit. For instance, select from source(‘raw_events’, ‘events’) instead of hardcoding schema-qualified table names; that gives the manifest full lineage and makes refactoring or environment swaps (dev → prod) straightforward. When you have multiple environments or mirrored schemas, centralize source declarations in a dedicated folder and name sources to reflect their logical role rather than physical location — this supports package-level reuse and package-qualified names when you publish analytics packages across teams.
Adopt a few pragmatic patterns: enforce descriptions and owners via linting in pre-commit, require freshness thresholds for streaming or near-real-time sources, and treat source schema changes as high-risk PRs that require both data-owner signoff and integration test runs. Taking this concept further, integrate source-level metadata into your CI and observability pipelines so a failing source freshness check can open an incident or pause downstream model runs automatically. That shifts your dbt YAML from documentation into an executable control plane for reliability and trust in your analytics stack.
YAML Best Practices and Placement
Building on this foundation, the way you organize dbt YAML in your repository determines how discoverable, reviewable, and maintainable your analytics code will be. Put simply: placement is a governance decision as much as a technical one, so choose patterns that reduce friction for reviewers and operators. Front-load descriptions and tests in YAML files that live close to the SQL they document so the contract is visible during code review. When dbt YAML is colocated with models, the manifest becomes a reliable, auditable map of intent rather than an afterthought scattered across the repo.
A practical rule of thumb is to store YAML files under the same model-paths defined in dbt_project.yml so dbt will discover them automatically; any .yml file beneath those paths can declare models:, sources:, seeds:, or snapshots:. For model metadata, colocate a schema.yml (or domain-specific name like payments_schema.yml) in the same folder as the related .sql files—e.g., models/staging/orders.sql and models/staging/schema.yml—so a single PR can change code and contract together. How do you decide between colocating and centralizing? Favor colocating for teams that want minimal context-switch during reviews and centralizing when strict governance or automated generation requires a single canonical source for many models.
If you choose a colocated pattern, prefer one YAML file per folder rather than one per model to reduce file sprawl; keep each file focused on the models in that directory to minimize merge conflicts and make diffs meaningful. For very large teams or monorepos, group YAML by domain (models/finance/schema.yml, models/marketing/schema.yml) so ownership boundaries mirror team responsibilities and CI can run targeted checks by path selectors. Use consistent naming conventions—schema.yml, sources.yml, or
Declare sources in dedicated YAML files as well, and place them where they reflect logical ownership rather than physical layout: if ingestion teams own raw tables, put sources under models/sources or models/raw with names that map to the producer (for example, models/raw/sources.yml). Attach freshness thresholds and owner metadata at the source level so alerts and routing are actionable (freshness: warn_after / error_after and meta: {owner: “ingest-team”}). Then reference sources from models using source(‘raw_events’,’events’) to preserve lineage and make refactoring or environment swaps straightforward. Treat source YAML as the ingress contract: it answers the question, what guarantees do we expect before running downstream transforms?
Remember precedence: dbt_project.yml defines project-wide defaults, YAML files under model paths declare schema/tests/metadata, and inline config() in a .sql file overrides settings for a specific model. Use YAML for discoverability, documentation, tests, and ownership metadata; reserve inline SQL config for one-off performance tuning or implementation-coupled materializations. That separation keeps contractual intent versioned and reviewable, while allowing engineers to experiment with runtime knobs locally without polluting the canonical metadata. When in doubt, ask whether a change affects the contract (put it in YAML) or only the implementation (keep it in SQL).
Operationalize placement choices with automation: lint YAML for missing descriptions and required tests in pre-commit hooks, fail CI on missing meta.owner for public models, and use path selectors in your pipeline to run focused test suites during PR validation. We recommend enforcing a small set of repo conventions (file names, required fields, domain folders) and surfacing violations early so dbt YAML becomes an executable contract rather than an afterthought. Taking these placement and best-practice patterns together makes reviews faster, incidents clearer, and the manifest genuinely useful for downstream tooling; in the next section we’ll apply these conventions to exposure and lineage definitions so consumers can rely on published datasets.