Introduction to KServe v0.15 and Large Language Models
KServe v0.15 represents a significant step forward in the world of machine learning model serving, especially as it integrates more seamlessly with Large Language Models (LLMs). Understanding the roles these technologies play can greatly enhance the deployment and management of machine learning solutions.
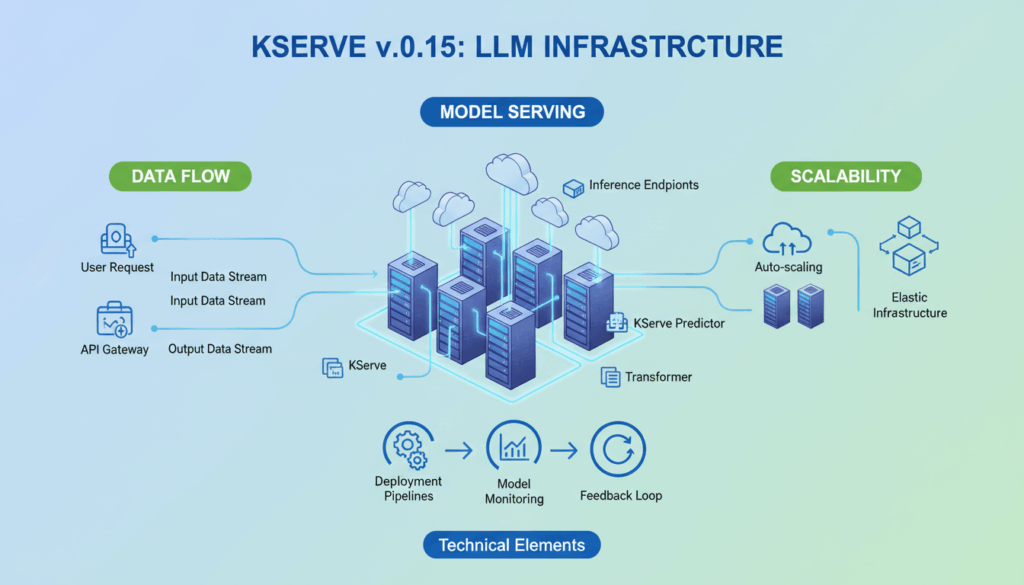
KServe functions as part of the robust ecosystem of Kubernetes, designed to simplify the complexities of deploying, managing, and scaling machine learning models. The latest version, v0.15, introduces enhancements that focus on performance optimization, improved configuration, and support for diverse model serving workloads. These improvements are particularly valuable when dealing with LLMs, given their computational demands and the need for seamless scaling and management.
Large Language Models are at the forefront of natural language processing innovation, enabling capabilities ranging from nuanced language understanding to context-aware conversation generation. As these models grow more sophisticated, so do their resource requirements, making efficient serving and scaling solutions vital.
KServe v0.15 supports multiple machine learning frameworks, which is crucial for LLMs often developed in diverse environments. The model serving architecture leverages containers to ensure isolation and resource allocation efficiency. This flexibility enables developers to serve models built with TensorFlow, PyTorch, ONNX, and others with minimal friction.
Optimizing resource allocation for LLMs can be achieved using KServe’s autoscaling capabilities. Autoscalers can dynamically adjust the number of replicas based on incoming traffic and usage metrics, ensuring that the infrastructure scales in line with demand, thus maintaining performance while controlling costs.
Moreover, KServe v0.15 enhances monitoring and logging, facilitating better integration with observability stacks. This feature is critical when serving LLMs, given their complex interactions and potential for unpredictable runtime behavior. Comprehensive logging and monitoring allow for actionable insights into model performance and infrastructure reliability.
To ease the deployment burden, KServe integrates with Istio and Knative-based components, which manage network traffic routing and model serving lifecycles efficiently. These integrations provide a cohesive environment for deploying models to production, which is essential when supporting the hefty demands of LLMs.
In practical terms, deploying an LLM with KServe involves several steps:
-
Containerize the Model: Use tools like Docker to containerize your model, ensuring all dependencies are included. This step ensures that the model can run consistently across environments.
-
Define a KServe InferenceService: Create a YAML configuration that defines your InferenceService, specifying the responsibility of the predictor, transformer, and explainer components as needed.
-
Deploy and Monitor: Apply the configuration to your Kubernetes cluster. Use integrated logging and telemetry tools to monitor performance and adjust configurations based on insights gathered from real-time data.
-
Scale Appropriately: Configure autoscaling rules that respond to traffic patterns, ensuring that your service remains responsive while optimizing resource utilization.
By leveraging KServe v0.15, organizations can unlock the full potential of Large Language Models, facilitating innovation while maintaining a robust, scalable, and efficient serving infrastructure.
Setting Up the Kubernetes Environment for KServe Deployment
To embark on deploying KServe for managing Large Language Models (LLMs), a robust Kubernetes environment is essential. The setup ensures that KServe operates efficiently, leveraging Kubernetes’ orchestration capabilities to serve models at scale. Here’s a detailed guide to setting up your Kubernetes environment, tailored for KServe v0.15 deployment.
Begin with provisioning a Kubernetes cluster suited to handle the demands of LLMs, which are typically resource-intensive. Cloud providers like Google Kubernetes Engine (GKE), Amazon Elastic Kubernetes Service (EKS), and Azure Kubernetes Service (AKS) are popular choices due to their managed services offering, simplifying cluster management and scaling.
Step 1: Provision a Kubernetes Cluster
-
Select a Cloud Provider: Choose a provider that aligns with your organizational needs. For instance, GKE offers seamless integration with Google Cloud services, while EKS and AKS provide robust scaling features and easy IAM integrations.
-
Cluster Configuration: When configuring your cluster, consider the number of nodes and their specifications (CPU, memory). Given the intensive nature of LLMs, opt for nodes with ample CPU and memory resources. For example, you might start with an n1-standard-4 machine type on GKE.
-
Enable Autoscaling: Configure cluster autoscaler to ensure your application scales based on demand. This is crucial for maintaining performance without incurring excessive costs. Autoscaling adjusts the number of nodes dynamically, allowing the environment to respond to fluctuating workloads.
Step 2: Install Kubernetes Tools
-
kubectl: Ensure that
kubectl, the Kubernetes command-line tool, is installed and configured for interacting with your cluster. This tool is essential for managing cluster resources and deploying applications. -
Kubeadm (if setting up a cluster manually): For those opting to create a cluster from scratch,
kubeadmprovides an efficient way to bootstrap the cluster. Note that this is generally more involved than using a managed service.
Step 3: Deploy KServe
-
Install KServe: With your Kubernetes environment ready, it’s time to install KServe. Begin by applying the KServe installation YAML. Use the following command:
bash
   kubectl apply -f https://github.com/kserve/kserve/releases/download/v0.15.0/kserve.yaml
This command sets up the necessary CRDs (Custom Resource Definitions) and controllers.
-
Verify Installation: After deployment, verify KServe is running correctly by checking the status of the pods and services. Use:
bash
   kubectl get pods -n kserve-system
This step ensures that all components of KServe are active and ready.
Step 4: Configure Networking
-
Istio Installation: KServe requires Istio for traffic management and routing. Install Istio using its installation scripts or integrate it with the managed Kubernetes services which offer Istio as an add-on.
-
Network Policies: Implement network policies to manage how pods communicate within the cluster. This is crucial for securing your deployment, ensuring that only authorized components can access the model-serving pods.
Step 5: Storage and Persistence
-
Persistent Volumes: LLMs often require access to large datasets or pre-trained models. Set up Persistent Volumes (PVs) and Persistent Volume Claims (PVCs) to ensure data persistence. Configure these storage solutions to be resilient and scalable.
-
Data Access Optimization: Use cloud-specific storage solutions such as AWS EFS, Google Cloud Filestore, or Azure Files, which provide the scalability and performance necessary for large datasets.
By meticulously setting up your Kubernetes environment with these steps, you lay a strong foundation for deploying KServe v0.15. This setup ensures scalability, efficiency, and robustness, crucial for the effective serving of Large Language Models.
Deploying an InferenceService for Large Language Models
In deploying an InferenceService tailored for Large Language Models (LLMs) using KServe v0.15, the task revolves around efficiently orchestrating inference requests and managing the resource-intensive processes these models demand. Here is a step-by-step guide on setting up an InferenceService in a Kubernetes environment.
Firstly, containerization of the language model is paramount. By packaging the model along with its dependencies into a Docker container, you ensure consistency in deployment environments. For instance, if your model is built using PyTorch, your Dockerfile might start with a base image from PyTorch and include all necessary libraries, configurations, and the model artifact itself. This ensures the environment used for inference mirrors that of development.
Example Dockerfile snippet:
FROM pytorch/pytorch:latest
WORKDIR /app
COPY requirements.txt ./
RUN pip install --no-cache-dir -r requirements.txt
COPY . .
CMD ["python", "serve.py"]
Next, define the KServe InferenceService. In KServe, an InferenceService is outlined through a YAML configuration file. This step involves specifying the model server, the container specifications, and the predictor configuration. It’s crucial to define resources like CPU and memory limits based on the expected demand to ensure optimal performance.
Here’s an example YAML configuration:
apiVersion: "serving.kserve.io/v1beta1"
kind: "InferenceService"
metadata:
  name: "my-llm-service"
spec:
  predictor:
    containers:
      - name: "predictor"
        image: "<registry>/my-llm-image:latest"
        resources:
          limits:
            cpu: "4"
            memory: "16Gi"
      args: ["--model", "/models/my-llm-model.pth"]
Once defined, apply the YAML configuration to your Kubernetes cluster. This is done using the kubectl command, which communicates the deployment specifications to the Kubernetes API server:
kubectl apply -f my-llm-inferenceservice.yaml
After deploying the InferenceService, focus on monitoring and scaling to ensure resilience and efficiency. Utilize KServe’s integration with monitoring tools like Prometheus and Grafana to track metrics related to throughput, latency, and resource utilization. These insights are invaluable for dynamically tuning autoscaling rules.
spec:
  autoscaler:
    minReplicas: 1
    maxReplicas: 10
    target:
      cpuUtilizationPercentage: 70
This configuration ensures that your InferenceService can scale in response to increased demand while maintaining cost efficiency.
Furthermore, implementing traffic management with Istio is advisable for managing the flow of requests and ensuring secure, load-balanced user interactions with the model serving interface. Istio allows you to configure load balancing, secure service-to-service communication, and detailed telemetry.
Finally, due attention should be given to security and workflow automation. Utilize CI/CD pipelines to build, test, and deploy model updates seamlessly, ensuring robust version control and reducing manual intervention. Additionally, setting up role-based access controls (RBAC) protects sensitive deployment configurations and data.
By adhering to these comprehensive steps, deploying an InferenceService for LLMs using KServe can be executed with precision, ensuring the large-scale language models are served efficiently and effectively in production environments. This holistic approach facilitates robust machine learning deployments, supporting cutting-edge applications in natural language processing.
Configuring Autoscaling and Load Balancing with KServe
Configuring autoscaling and load balancing within KServe necessitates a meticulous approach to ensure that the infrastructure can efficiently handle the dynamic demands of serving Large Language Models (LLMs). KServe leverages Kubernetes’ scalable architecture to facilitate these functions, allowing services to dynamically adjust resources and route requests effectively.
Autoscaling is a fundamental feature in adapting to varying workloads. KServe utilizes Kubernetes’ Horizontal Pod Autoscaler (HPA) to adjust the number of pod replicas that serve a model based on real-time metrics. This setup ensures that application performance remains stable during traffic spikes and helps optimize resource utilization during low-demand periods.
To configure autoscaling, start by defining the target metrics using Custom Metrics Adapter available within Kubernetes. For machine learning applications like LLMs, you would typically target CPU, memory usage, or even custom metrics like inference request rates. Configurations are typically specified in the InferenceService YAML file.
apiVersion: autoscaling/v2beta2
kind: HorizontalPodAutoscaler
metadata:
  name: my-llm-inferenceservice
spec:
  scaleTargetRef:
    apiVersion: apps/v1
    kind: Deployment
    name: my-llm-deployment
  minReplicas: 1
  maxReplicas: 10
  metrics:
  - type: Resource
    resource:
      name: cpu
      target:
        type: Utilization
        averageUtilization: 60
In this example, the autoscaler adjusts the number of replicas between 1 and 10 based on CPU utilization, maintaining an average target of 60%. This flexibility ensures that your service can efficiently respond to demand fluctuations without degrading performance or overprovisioning resources.
Load balancing is another critical component, ensuring that incoming requests are distributed evenly across the available instances of services, reducing latency, and maximizing throughput. KServe typically integrates with Istio for advanced traffic management. Istio allows you to define routing rules and manage the flow of data between services using a service mesh architecture.
For effective load balancing, install Istio and configure your cluster to utilize its load balancing algorithms. Using Istio, you can apply policies that determine how requests are directed, including strategies like round-robin or least connections.
After setting up Istio, configure a VirtualService in Kubernetes to manage the traffic for your service. An example configuration might look like this:
apiVersion: networking.istio.io/v1alpha3
kind: VirtualService
metadata:
  name: my-llm-service
spec:
  hosts:
  - "my-llm-service.default.svc.cluster.local"
  http:
  - route:
    - destination:
        host: "my-llm-service"
        subset: "v1"
      weight: 100
This setup ensures that all traffic to my-llm-service is routed to the appropriate pod, where dynamic load balancing is applied to evenly spread requests.
For more sophisticated traffic management, Istio allows features like circuit breaking, which protects services from overload, and fault injection, which helps in testing the resiliency of your service by simulating failures.
Ultimately, the combination of autoscaling through HPA and load balancing via Istio positions KServe to efficiently handle the demanding nature of LLMs. By optimizing these configurations, organizations can ensure reliable and scalable model serving infrastructure, capable of adapting to varying levels of traffic and computational demand while maintaining optimal performance and resource efficiency.
Implementing Advanced Features: Model Caching and KV Cache Offloading
Caching plays a pivotal role in enhancing the performance and efficiency of serving Large Language Models (LLMs). The integration of model caching and KV (Key-Value) cache offloading in KServe can substantially alleviate computational load and reduce latency during inference requests. These advanced features ensure that both frequently accessed model parts and intermediate computation results are readily available, minimizing redundant operations.
Implementing caching strategies in KServe begins with identifying what elements of the model or its pipeline would benefit from being cached. One effective practice is to cache model weights or specific layers, especially layers that are static or reused across multiple inference tasks.
For model caching:
-
Layer Caching: In scenarios where certain model layers are consistently reused, caching their outputs can save significant computation time. For example, in a transformer model, caching attention weights that remain constant across different inputs can reduce processing overhead.
-
Cache Configuration: Configuring KServe to accommodate such caching involves modifying the model serving container to include a caching mechanism, such as Redis or Memcached, to store these components. The Dockerfile can be extended to install and configure a caching service that interacts directly with the inference code.
yaml
apiVersion: "serving.kserve.io/v1beta1"
kind: "InferenceService"
metadata:
  name: "llm-cache-service"
spec:
  predictor:
    containers:
    - name: "predictor"
      image: "<registry>/cached-llm-image:latest"
      resources:
        limits:
          cpu: "4"
          memory: "16Gi"
      env:
      - name: CACHE_BACKEND
        value: "redis"
      args: ["--cache_layer", "true"]
This configuration includes environment variables to facilitate connection and operational parameters for the caching backend.
For KV cache offloading:
-
Offload Configuration: KServe supports offloading computational state or intermediate results via key-value stores to optimize resource usage. Implementing this requires setting up a KV store where computations such as model intermediates or temporary variables can be stored and retrieved efficiently.
-
Integration with Serving Code: Modify the serving code to use a KV store for offloading. This typically involves setting up interactions between the inference service and a Redis-like distributed KV store, where frequently accessed data can be stored. When intermediate results are known to recur across sessions or requests, storing these in a KV store significantly speeds up retrievals and minimizes redundant calculations.
-
Service Configuration Example:
yaml
apiVersion: "serving.kserve.io/v1beta1"
kind: "InferenceService"
metadata:
  name: "llm-kv-cache-service"
spec:
  predictor:
    containers:
    - name: "predictor"
      image: "<registry>/llm-image:latest"
      resources:
        limits:
          cpu: "4"
          memory: "16Gi"
      env:
      - name: KV_CACHE_ENABLED
        value: "true"
      args: ["--enable_kv", "true"]
The above highlights the integration of environment variables and the configuration necessary to activate KV-based caching.
Integrating these caching strategies into KServe significantly enhances application responsiveness and reduces costs associated with compute-intensive workloads. By leveraging model and KV caching, organizations deploying LLMs can ensure scalability and performance excellence, optimizing both resources and user experience.
Monitoring and Managing Deployed Models in KServe
Effectively monitoring and managing deployed models in KServe is a crucial aspect of maintaining resilient and performant machine learning systems. This involves employing a range of tools and practices to track model health, performance, and user interactions, allowing for proactive adjustments and ensuring seamless operation.
Monitoring deployed models in KServe can be achieved by integrating with popular observability tools. Prometheus—an open-source monitoring and alerting toolkit—is often used in concert with Grafana, a feature-rich metrics dashboard. These tools provide real-time insights into model throughput, latency, error rates, and resource utilization.
To set up monitoring in your KServe environment, begin by configuring Prometheus to scrape metrics from the KServe pods. This involves defining a Prometheus configuration that specifies the endpoints from which metrics should be collected. KServe provides native support for Prometheus metrics, exposing various metrics automatically.
scrape_configs:
  - job_name: 'kserve'
    static_configs:
      - targets: ['localhost:<port>']
Once Prometheus is configured, deploy Grafana to visualize these metrics. Grafana dashboards can be tailored to display key performance indicators specific to your deployment, such as request latency, traffic volume, and resource consumption.
For example, a Grafana dashboard might include panels that show:
- CPU and Memory Usage: Track the resource utilization of your model serving pods to identify potential bottlenecks.
- Request Latency: Evaluate how long each inference request takes, helping to pinpoint areas that require optimization.
- Error Rates: Monitor the frequency and types of errors that occur, enabling rapid troubleshooting.
KServe also supports integration with Kiali, a management console for Istio. Kiali provides service mesh observability, offering insights into traffic flows within the cluster, which is crucial for managing deployed models that use Istio’s traffic routing capabilities. With Kiali, you can visualize service dependencies, monitor the health of individual services, and detect anomalies in traffic patterns.
For alert management, integrate with the Alertmanager component of Prometheus. Alertmanager can be configured to send notifications to various communication channels like email, Slack, or PagerDuty when predefined thresholds are breached, such as elevated error rates or unusual latency spikes.
Managing models in KServe also involves implementing strategies for update and rollback. When deploying new model versions, use a canary deployment strategy to gradually route traffic from the existing model to the new version. This way, you can monitor the performance of the new model on a smaller subset of traffic. If issues arise, the canary model can be immediately rolled back, ensuring that disruptions to service are minimized.
apiVersion: v1
kind: Service
metadata:
  name: "llm-service"
spec:
  selector:
    app: "llm"
  ports:
  - protocol: "TCP"
    port: 80
    targetPort: 8080
In summary, monitoring and managing models in KServe involves a combination of real-time metrics tracking, automated alerts, and strategic deployment practices. By utilizing tools like Prometheus, Grafana, and Kiali, along with adopting effective deployment strategies, organizations can maintain robust and adaptive model serving infrastructures, ensuring high availability and performance even in dynamic production environments.