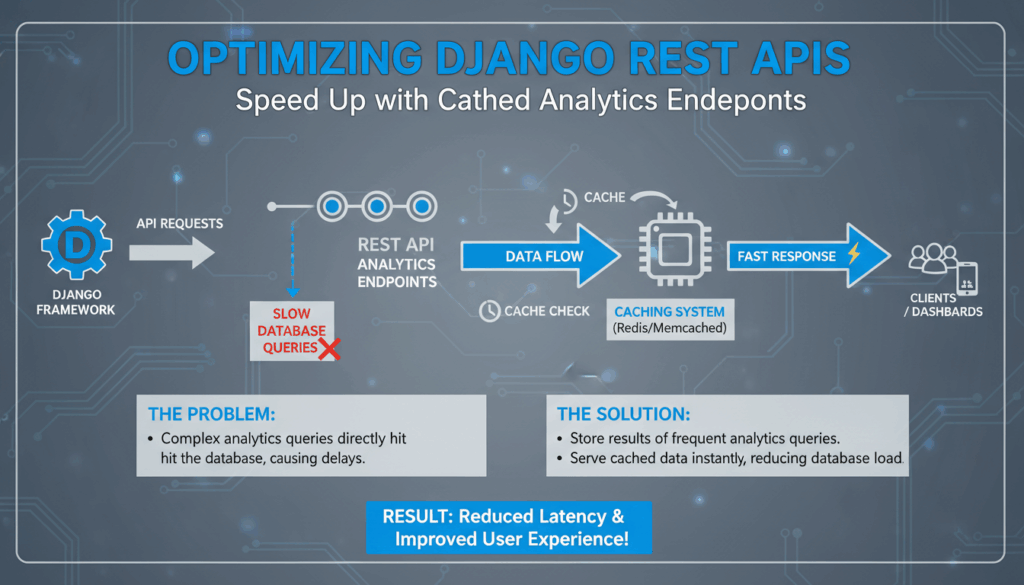
Understanding the Need for Caching in Django REST APIs
In building efficient and responsive web applications, especially with Django Rest Framework (DRF), managing resource-intensive operations is crucial. An API’s performance is often tied to its ability to deliver data quickly and handle multiple requests concurrently. This is where caching becomes a critical component, helping reduce server load, cut down latency, and provide a smoother user experience.
When clients interact with your Django REST APIs, the backend processes a large number of queries, potentially leading to slower response times due to repeated database hits. For instance, if your application aggregates data from multiple related models or runs complex computations for analytics, the time taken to fetch and process this data can significantly impact performance. This is particularly critical in environments where client applications need real-time data processing or in high-traffic scenarios.
Benefits of Implementing Caching
-
Reduce Load on Database Servers: Caching can offload traffic from the database by storing frequently accessed data in memory. Once the data is cached, subsequent requests can be served quickly from the cache rather than re-querying the database.
-
Improve Response Times: With caching, the time taken to process the request and send a response back to clients can be drastically reduced. This enhancement is often most visible with endpoints delivering complex datasets.
-
Scalability: By reducing backend workload, caching allows applications to handle more concurrent requests, making your API scalable and efficient.
Use Cases for Caching in Django REST APIs
- Static Content Serving: Content that doesn’t change frequently, such as site headers, footers, and other static assets, can be cached to minimize the load of repeated transmission.
- Complex Query Results: Caching the results of computationally heavy database queries is common. For example, let’s consider an endpoint that aggregates user statistics. Such aggregations can be cached, avoiding recalculations for every request.
- Rate-Limited Endpoints: APIs that have rate limits benefit from caching since it allows the server to rapidly serve requests for data that has already been fetched recently.
Tools and Techniques
- In-Memory Stores: Using in-memory data stores such as
RedisorMemcachedhelps store and retrieve cached data with sub-millisecond speed. - Django Caching Frameworks: Django’s caching framework integrates well with REST frameworks, allowing easy caching of views, templates, and data. Configuration is straightforward:
python
  CACHES = {
      'default': {
          'BACKEND': 'django.core.cache.backends.memcached.MemcachedCache',
          'LOCATION': '127.0.0.1:11211',
      }
  }
– Custom Middleware: Custom middleware can be used for more granular control over what to cache and when. It can be configured to cache entire responses or specific parts of data.
Key Considerations
- Consistency and Staleness: Implementing invalidation strategies is essential to ensure cached data doesn’t become stale. This can involve setting timeouts or manual cache purges.
- Cache Capacity: Determining the size of your cache and what data to store is important, as inappropriately large caches can waste resources.
Incorporating caching in Django REST APIs not only boosts performance but also helps maintain consistency and reliability, especially under heavy loads. By understanding and leveraging appropriate caching strategies and tools, developers can ensure that their APIs remain fast and responsive, providing an enhanced user experience.
Setting Up Redis for Caching in Django
To integrate Redis as a caching mechanism in a Django project, you’ll need to follow a series of steps. Redis is a high-performance in-memory data structure store that can act as a database, cache, and message broker. It is particularly well-suited for caching in web applications due to its speed and efficiency. Here’s how you can set up Redis for caching in Django:
1. Install Redis
To start, ensure that Redis is installed on your system. You can download Redis from the official website and follow the installation instructions for your operating system. Alternatively, with Docker, you can run Redis using the command:
$ docker run --name redis -p 6379:6379 -d redis
This command will download the Redis image and start the service in a Docker container, making it accessible on port 6379.
2. Install the Redis Python Client
For Django to interact with Redis, you need a Python client that handles communication with Redis. redis-py is a popular choice and can be installed via pip:
$ pip install redis
Additionally, for Django’s caching framework, you might need the django-redis library:
$ pip install django-redis
3. Configure Django to Use Redis
Modify your Django project settings to use Redis as the cache backend. Update the CACHES setting in settings.py to point to your Redis server:
CACHES = {
    'default': {
        'BACKEND': 'django_redis.cache.RedisCache',
        'LOCATION': 'redis://127.0.0.1:6379/1',
        'OPTIONS': {
            'CLIENT_CLASS': 'django_redis.client.DefaultClient',
        }
    }
}
This configuration tells Django to use Redis for caching and defines the Redis server’s URL.
4. Testing the Cache
Before proceeding with full integration, it’s good practice to test if the caching mechanism is correctly set up. Use Django’s shell to verify:
$ python manage.py shell
In the shell, try setting a cache value:
from django.core.cache import cache
cache.set('my_key', 'hello, world!', timeout=60)
value = cache.get('my_key')
print(value)  # Should return 'hello, world!'
If this executes without errors, your Django application is successfully communicating with Redis.
5. Cache Views or Data
With Redis integrated, you can decide what to cache. Common caching strategies include:
- View Caching: Use the
cache_pagedecorator to cache entire views:
“`python
from django.views.decorators.cache import cache_page
@cache_page(60 * 15) # Cache for 15 minutes
def my_view(request):
# Your view logic…
“`
-
Template Fragment Caching: Cache specific parts of templates to enhance performance.
-
Low-Level Caching: Manually cache results of complex database queries or computations:
python
  expensive_result = cache.get_or_set('expensive_key', lambda: complex_calculation(), timeout=300)
6. Manage Cache Invalidation
Ensure that the cache remains consistent and relevant by setting appropriate timeouts and implementing cache invalidation strategies. This may involve manually deleting keys or using signals to automatically update or invalidate cached data when related models change.
Redis provides a powerful way to improve the performance and scalability of Django applications by drastically reducing database query load and improving response times. Proper setup and careful management of caches can lead to a significant boost in your application’s user experience.
Implementing Cached Analytics Endpoints in Django REST Framework
To efficiently implement caching for analytics endpoints in Django REST Framework, the process involves several steps that harness the power of caching mechanisms, such as Redis, to store the results of complex data queries. This not only accelerates response times but also reduces server load by minimizing repetitive database operations.
In most typical scenarios, analytics endpoints may require repetitive and resource-intensive database aggregation queries. These can be anything from calculating total sales figures over the past month, to compiling users’ engagement statistics. Caching such data at the endpoint level ensures that once the data is processed and a cache is set, future requests can be quickly served with the cached data until a cache refresh is initiated.
Steps to Implement Cached Analytics Endpoints
1. Identify Cacheable Queries
First, identify the queries that are good candidates for caching. Queries that fetch aggregated data, require complex JOIN operations, or are costly in terms of execution time benefit most from caching.
For example, if you have an endpoint that calculates active user metrics by combining various user activity logs, this computation might be a good candidate for caching.
2. Set Up Your Caching Backend
Make sure your caching backend is configured correctly. Using Redis for this purpose is common due to its speed and in-memory nature:
CACHES = {
    'default': {
        'BACKEND': 'django_redis.cache.RedisCache',
        'LOCATION': 'redis://127.0.0.1:6379/1',
        'OPTIONS': {
            'CLIENT_CLASS': 'django_redis.client.DefaultClient',
        }
    }
}
This configuration should be included in your settings.py to ensure that Django is correctly interacting with the Redis server.
3. Define Caching Logic in Views
Once the caching is set up, the next step is to implement caching logic at the view level. Typically, Django REST Framework views can be cached using the cache_page decorator:
from django.views.decorators.cache import cache_page
from django.utils.decorators import method_decorator
from rest_framework.views import APIView

class AnalyticsView(APIView):
    @method_decorator(cache_page(60 * 60))  # Cache for one hour
    def get(self, request, *args, **kwargs):
        # Analytical processing logic here
        return Response(data)
In this setup, the cache_page decorator caches the result of the get method for an hour, which means the analytics data is retrieved quickly upon subsequent requests within that timeframe.
4. Control Cache Invalidation
It’s vital to manage cache invalidation appropriately to ensure that clients aren’t served stale data. Strategies such as cache expiration and manual invalidation help in keeping the cached data fresh and reliable.
For example, you can leverage Django signals to invalidate cache entries when underlying data changes:
from django.db.models.signals import post_save, post_delete
from django.dispatch import receiver
from .models import UserActivity

@receiver([post_save, post_delete], sender=UserActivity)
def clear_cached_activity_data(**kwargs):
    cache.delete('activity_data_cache_key')
This method deletes the relevant cache entries whenever a UserActivity object is modified, ensuring cache freshness.
5. Test and Monitor
Finally, testing is crucial to ensure that the caching behavior matches expectations and truly enhances performance. Use Django’s testing tools to confirm that requests are served from the cache and that cache invalidation works as planned. Additionally, monitoring tools can help track cache hits and misses, providing insights into caching effectiveness.
Implementing caching at the endpoint level for analytics in Django REST Framework dramatically improves application performance, scalability, and user experience. Thoughtful application of these caching strategies makes it possible to maintain the balance between serving fresh data and reducing server load by minimizing redundant computations.
Optimizing Cache Performance and Invalidation Strategies
Achieving optimal cache performance in Django REST APIs is essential for responsive and scalable applications. However, effective caching goes beyond merely storing data; it involves strategic invalidation to ensure that the data is fresh and consistent.
Effective cache performance begins with selecting an appropriate cache backend. Redis is a popular choice due to its in-memory data storage capabilities, offering fast read and write access. Configuring the cache to utilize Redis involves setting it up as shown in the previous sections. However, merely setting up the cache isn’t sufficient for optimization.
Monitor Cache Usage: Continuous monitoring of cache usage is fundamental. Tools like RedisInsight can provide insights into cache hit rates, memory usage, and latency statistics, which are crucial for evaluating performance. These metrics help determine if the cache is effectively reducing database load and serving requests efficiently.
Cache Granularity: Identifying the optimal granularity of cached data is another critical step. Depending on the use case, you might choose to cache entire views, specific dataset queries, or even individual objects. For instance, caching the result of a frequently accessed analytics calculation can drastically reduce server load.
Time-to-Live (TTL): Configurationally, Time-to-Live (TTL) settings help control cache freshness. The TTL determines how long a cache entry is valid before it expires and needs renewing. For instance, setting a TTL of 10 minutes on user authentication tokens ensures that the data stays fresh without overwhelming the server with unnecessary computations.
Example of setting TTL in Django:
from django.core.cache import cache

# Set cache with a timeout (TTL)
cache.set('key', 'value', timeout=600)  # Expires in 10 minutes
Appropriate Invalidation Strategies:
To prevent serving stale data, selecting suitable cache invalidation strategies is imperative. It’s a balance between freshness and performance efficiency:
- Explicit Invalidation: This approach involves manually deleting cache keys when the underlying data changes. This strategy is often utilized alongside Django’s signals to trigger invalidation automatically whenever a model instance is modified or deleted. Here’s a practical example:
“`python
from django.core.cache import cache
from django.db.models.signals import post_save, post_delete
from django.dispatch import receiver
from .models import ExampleModel
@receiver([post_save, post_delete], sender=ExampleModel)
def invalidate_cache_on_update(sender, **kwargs):
cache.delete(‘example_key’)
“`
-
Versioned Caching: Another sophisticated method involves versioning the cache keys. Each time an update occurs, the cache key version is incremented, effectively invalidating the old data. This strategy reduces the need for complex invalidation logic but requires careful key management.
-
Least Recently Used (LRU) Caching: Implementing an LRU caching mechanism, which automatically invalidates the least accessed data based on a specified capacity limit, can optimize performance in highly dynamic environments with large data sets.
-
Write-Through Caching: This approach involves writing changes to both the database and the cache simultaneously, ensuring instant cache updates. It allows quick access to fresh data but can increase write latency.
Understanding and implementing these invalidation strategies ensure that API responses are not only fast but also accurate and up-to-date. This strategic alignment between cache utilization and data validation is the cornerstone of a high-performance, reliable caching system.
Furthermore, Prefetching and Prewarming Cache, especially for analytics that predictably demand similar datasets, can improve performance by preparing cache content before user requests, reducing latency when those requests occur. Prewarming scripts can be incorporated into Django’s periodic tasks using celery or cron jobs to update and validate the cache regularly.
Training teams on caching and invalidation are also critical, ensuring they are familiar with these methodologies and frequently monitor performance impact under production-like loads. This approach minimizes stale data risk, providing quick and precise data delivery to clients.
Optimizing cache performance and strategies for cache invalidation enhances system throughput and user satisfaction by making Django REST APIs swift and responsive. It emphasizes a deeper understanding of caching principles, the efficient execution of caching configurations, and the proactive management of cached data to maintain application integrity.
Monitoring and Testing Cached API Endpoints
For ensuring the reliability and performance of cached API endpoints in Django applications, continuous monitoring and testing become crucial. These processes help detect and resolve potential issues that may arise due to staleness, cache misses, or improper cache invalidation.
Monitoring Cached API Endpoints
Monitoring involves keeping an eye on how effectively the cache is operating. This can be achieved by tracking several critical metrics and using specialized tools.
1. Track Cache Performance Metrics
Effective monitoring entails analyzing cache hit rates, memory usage, and latency metrics. A high cache hit rate indicates that most requests are being served from the cache, which results in better performance. Conversely, a low hit rate can imply frequent cache misses, necessitating further investigation.
- Cache Hit Rate: The ratio of cache hits to total requests. High hit rates suggest efficient caching.
- Latency: Time taken to serve requests via cache versus database queries.
- Memory Usage: Ensure Redis (or the chosen backend) is optimally managing memory to prevent overload or thrashing.
2. Use Monitoring Tools
There are various tools that can facilitate cache monitoring:
- RedisInsight: A GUI for managing and monitoring Redis, providing insights into key spaces, memory usage, and overall performance.
- Apm Tools: Instruments like New Relic or Datadog can offer real-time monitoring and alerting for cache performance parameters.
3. Set Alerts for Cache Metrics
Configuring alerts for specific thresholds like low hit rates, high memory use, or latency spikes can help in early fault detection. These alerts enable timely intervention to address any discrepancies or inefficiencies.
Testing Cached API Endpoints
Testing is essential to ensure that the caching mechanisms are correctly implemented and functioning as expected. It verifies both performance improvements and data accuracy.
1. Automated Testing
Automated tests should be integrated into your CI/CD pipeline to validate caching behavior during build deployments. These tests can verify that:
- Caching logic doesn’t interfere with data freshness.
- Cache invalidation occurs correctly after data updates.
For example, using Django’s TestCase, you can write tests to assert that the same API call results in a cache hit on subsequent requests:
from django.test import TestCase
from django.core.cache import cache
from .models import ExampleModel

class CacheTestCase(TestCase):
    def test_cache_behavior(self):
        # Initial request should populate the cache
        response1 = self.client.get('/api/endpoint/')
        cached_response = cache.get('my_endpoint_cache_key')

        # Confirm the cache hit
        self.assertEqual(response1.json(), cached_response)

        # Update underlying data
        obj = ExampleModel.objects.create(field='value')
        obj.save()

        # Test cache invalidation
        response2 = self.client.get('/api/endpoint/')
        self.assertNotEqual(response1.json(), response2.json())
2. Load Testing
Conduct load testing to simulate high traffic conditions and evaluate how well the cached endpoints perform under stress. Tools like JMeter or Locust can be used to simulate multiple users accessing endpoint data, ensuring the cache withstands the demand without degradation in performance.
3. Manual Testing and Debugging
Manual testing may involve using tools like Postman to interact with the API and observe real-time response behaviors. It helps validate automated test findings and spot anomalies in cache handling.
4. Regression Testing
As new features are added or changes are made, regression testing ensures that the existing caching mechanisms continue to function correctly. These tests help catch inadvertent disruptions caused by code updates.
In essence, through careful monitoring and robust testing, developers can ensure that cached API endpoints not only boost performance but also maintain data integrity and user experience. Frequent auditing of logs, accompanied by practical testing strategies, reinforces the system’s reliability and helps in proactively managing cache-related challenges.