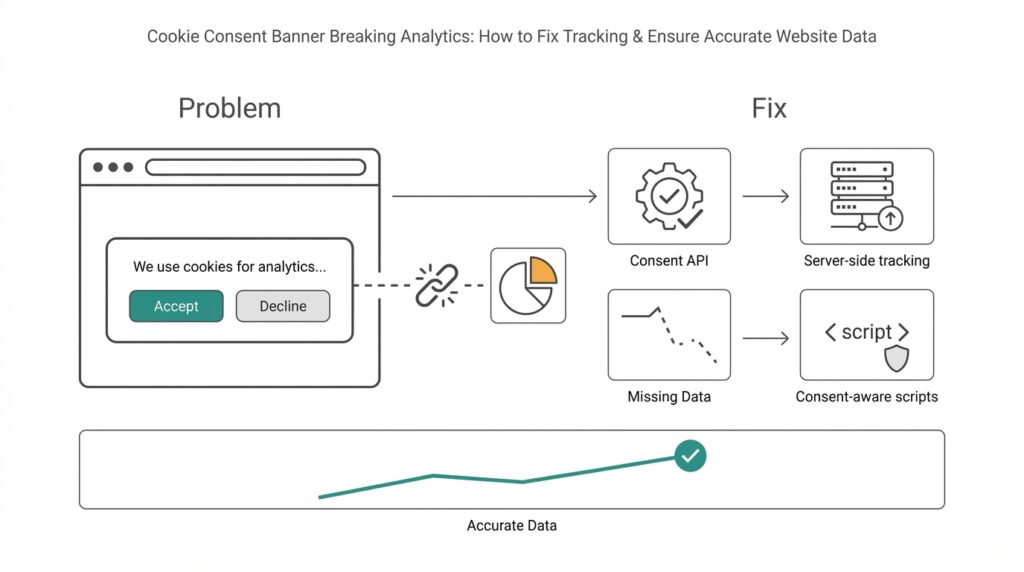
How banners break analytics
Imagine you rolled out a cookie consent banner and then noticed a sudden drop in your analytics numbers — fewer pageviews, missing conversions, strange traffic patterns. Right away you’re asking if the cookie consent banner or your tracking is to blame. A cookie consent banner is the pop-up that asks visitors for permission to use cookies; analytics here means the tools that measure visits, events, and conversions. In the first few sentences we should be clear: consent interfaces change what tracking can see, and that interaction is where most data problems start.
When visitors see a consent form, many consent management platforms (CMPs) will block tracking until a choice is made. A CMP is the tool that shows the banner and records the visitor’s preferences. Blocking means scripts that send data to analytics providers are prevented from running, or cookies are not set. That behavior protects privacy but also interrupts the normal flow of data — scripts that would normally record a pageview, start a session, or fire conversion events are held back like actors waiting for their cue.
What actually breaks inside analytics? First, you’ll get incomplete data: users who decline consent simply disappear from many reports, so totals are lower than reality. Second, attribution becomes messy: if a visitor initially came from an ad but declined cookies later, your ad platform may not be credited for the conversion. Third, sampling and segmented analyses skew because consenting users are often different from non-consenting ones. In plain terms, your numbers are no longer a faithful reflection of all visitors — they’re a reflection of visitors who agreed to be measured.
Let’s look at a concrete scene to make this stick. Suppose 40% of visitors decline tracking and those people are mostly mobile users. An A/B test that shows improved conversion on mobile will look weaker because the mobile traffic is undercounted. Or imagine a checkout event that fires when the purchase confirmation page loads — if the analytics script is blocked until the confirmation page itself, that conversion may never be recorded. These are practical examples of how tracking gaps morph into wrong decisions: misjudged experiments, wasted ad spend, and confusing KPI trends.
Under the hood there are a few common technical reasons for data loss: race conditions where the page finishes before consent is granted; tag managers and analytics scripts that are never initialized; and consent toggles that change cookie behavior mid-session. A tag is a small piece of code that sends a specific kind of data (like a pageview) to an analytics service; a tag manager helps control when and how those tags fire. If tags are gated behind consent, events that happen before the user responds can be lost forever unless you queue or replay them after permission is granted.
Building on this foundation, it helps to think about the problem like a recipe that lost a step: missing an ingredient (tracking) changes the final dish (analytics insights). We’ve now seen why cookie consent banners can cause incomplete tracking, skewed attribution, and technical race problems, and we’ve described what those symptoms look like in real reporting. Next, we’ll look at practical, consent-aware approaches that preserve privacy while restoring accurate website data so your decisions are grounded in reality.
Understand consent signals and categories
Imagine you just clicked “Accept” or “Manage preferences” and felt a tiny tug on how your analytics behave — that tug is driven by cookie consent, consent signals, and consent categories working behind the scenes. Right away we should name the players: cookie consent is the visitor’s permission about tracking, a consent management platform (CMP) is the tool that asks and records that permission, and consent signals are the little pieces of information the CMP sends out to tell your tags what they may or may not do. Analytics tracking is affected the moment those signals arrive (or don’t).
Think of a consent signal like a polite note handed to your analytics system: it says what the visitor allowed. A consent signal can be as simple as “no marketing cookies” or as precise as a structured consent string — a short piece of data that encodes choices. When we say consent categories, we mean the labelled buckets a CMP uses (for example: necessary, preferences, statistics, marketing). Necessary means tools required for the site to function; statistics typically maps to analytics tracking; marketing covers ads and cross-site identifiers. Introducing these as characters helps: the CMP is the messenger, the consent string is the note, and the categories are the labels on that note.
Now let us take a step back for a moment and see how those notes actually travel. Some CMPs write a cookie or set a JavaScript variable in the page; others publish a consent object into the data layer (the part of your site where tags look for information). Tags — the little scripts that send pageviews and events — read that consent object before firing. If the signal says “no statistics,” the analytics tag should pause. That pause can happen in three main ways: the tag never loads, the tag loads but refuses to send data, or the tag queues events locally until permission is granted. Each approach changes the timeline of what your analytics actually sees.
Putting labels on behavior makes the impact clearer. When a user denies the statistics category, pageviews and custom events tied to analytics will often be missing; when marketing is denied, ad platforms lose attribution data; when preferences are allowed, you can store interface settings but still block behavioral profiling. Imagine a checkout where statistics were denied until the confirmation page — your purchase event might never reach the analytics provider. This is exactly why consent categories matter: they map user intent to technical controls, and those controls shape the fidelity of your reports.
How do you make sure analytics still tell a useful story when people choose different categories? First, understand the default behavior of your CMP and tag manager: do they block, queue, or proxy events? Second, decide which categories truly need to gate which tags — treat analytics as belonging to the statistics category unless you intentionally separate measurement from marketing. Third, consider graceful patterns: queue events until consent, replay them when granted, or capture minimal, non-identifying signals server-side when allowed. Each choice trades off data completeness, privacy risk, and implementation complexity, so we walk through them deliberately.
Building on this foundation, knowing the exact shape of consent signals and categories on your site prepares you for practical fixes. With that shared map — what the CMP sends, how tags interpret categories, and which events are gated — we can move to concrete tactics: queuing user events, delaying tag initialization, and implementing server-side endpoints that honor the visitor’s choices. That’s where the troubleshooting becomes hands-on and where your analytics start behaving in a consent-aware, privacy-respecting way.
Choose and configure a CMP
Imagine you’ve decided to fix the drop in your analytics after rolling out a cookie consent banner and now stand in front of a shelf full of CMP options—each box promises privacy and compliance, but only some will preserve useful measurement. A CMP, short for consent management platform, is the tool that displays the consent UI and emits consent signals (the machine-readable note that tells other scripts what a user allowed). How do you pick a CMP that preserves analytics while respecting consent? Let’s walk through choices and configuration like we’re picking ingredients and cooking steps for a dependable recipe.
First, prioritize how a platform handles consent signals and categories because that determines whether your analytics will see pageviews, events, and conversions. Look for a consent management platform that writes a clear, documented consent object into the data layer (the shared place where tags look for information) and exposes a callback or event when preferences change. Building on our earlier discussion of consent categories, confirm the CMP supports the categories you need (for example, statistics/analytics separate from marketing) and that it allows configurable defaults for first-time visitors. That foundation reduces race conditions where tags start before the consent state is known.
Next, decide the CMP’s blocking strategy: block, queue, or proxy. Blocking prevents tags from loading until consent is granted, queueing holds events locally until permission arrives, and proxying routes minimal data through a server-side endpoint that respects consent choices. Think of these like traffic control: blocking closes the gate, queueing parks cars in a lot, and proxying sends filtered cars through a tollbooth that removes identifiers. For analytics accuracy, we typically favor a queue-or-proxy approach because it preserves user actions that occur before a decision without sending personal identifiers until allowed.
Integrations are the next test: does the CMP integrate cleanly with your tag manager and analytics provider? A tag manager is a tool that orchestrates tags (snippets that send data), so the CMP should either provide a native connector or a documented method to push consent into the tag manager’s data layer. Configure your tag manager triggers to read the consent object and to fire only when the matching category is allowed; where possible create a reusable “consent_granted” event that other tags can listen to. This mapping—category to tag to trigger—is where most sites lose or preserve crucial conversion events.
Now let’s get practical about configuration settings that rescue analytics. Enable event queuing inside the CMP or tag manager so pageviews and conversion attempts are stored in memory (or localStorage) and replayed when consent comes in; implement a clear replay timeout so events aren’t held forever. If you use server-side analytics (sending hits through your backend), configure the proxy to strip personal identifiers until consent is explicit, and record only aggregated, non-identifying metrics when consent is denied. These patterns keep analytics useful while reducing privacy risk.
Don’t forget testing and observability: set up a staging site and simulate consent states—accept, deny, and delayed response—while watching network calls and the data layer. Log consent transitions and tag firings in a diagnostic mode so you can see when a pageview was queued, replayed, or dropped. Also choose a CMP vendor that documents their consent API clearly and offers webhooks or logs; vendor support matters when you chase a rare race condition that’s silently dropping ecommerce conversions in production.
Finally, balance compliance with measurement by documenting your mapping of consent categories to tags and sharing it with teammates who run experiments, ads, or product analytics. With that map in place and a CMP configured to expose robust consent signals, queue events, and integrate with your tag manager or server proxy, your analytics will stop lying to you and start telling a consent-aware story. Building on this configuration work, next we’ll look at concrete code patterns to queue and replay events so nothing important is lost.
Set up Google Consent Mode V2
Imagine you just shipped a new cookie banner and then watched pageviews and conversions drop — that sinking feeling is exactly why we need to wire up Google Consent Mode V2 correctly. Right away, understand that this tool (Google Consent Mode V2) acts like a translator between your consent management platform and your analytics: it lets tags run in a privacy-aware way by changing how storage and identifiers are used based on the visitor’s choices. If you want reliable analytics without violating preferences, this is the integration that most often closes the gap between “blocked” and “lost forever.”
First, let us meet the characters and their roles so nothing feels magical. A consent signal is simply a machine-readable note that says what a visitor allowed — for example, whether analytics or ad storage is permitted; the data layer is the shared place on your page where tags look for those notes; and gtag/gtm (Google Tag Manager) are the tools that will read those signals and decide what to send. Google Consent Mode V2 introduces finer-grained controls for storage and measurement so that when analytics_storage is denied, your tags can still send aggregated, non-identifying hits instead of silently dropping important events. That distinction is why consent mode preserves useful analytics while respecting choices.
Before you touch code, check a few prerequisites so the setup is smooth. Make sure your CMP can emit a clear consent object into the data layer or fires a callback when a visitor changes preferences; confirm your tag manager (we’ll assume Google Tag Manager or a compatible system) can read that consent object; and decide whether you’ll use client-side queuing, server-side proxying, or both for events that happen before a choice is made. These decisions—where we store consent, how long we queue events, and whether server-side filtering is available—determine whether early page interactions are replayed or discarded.
Now we walk through the practical wiring without getting lost in syntax. First, initialize consent mode with privacy-preserving defaults when the page loads so tags don’t assume permission: for example, set analytics_storage and ad_storage to ‘denied’ until the CMP says otherwise. Then, when the CMP writes the consent signal to the data layer or fires its change event, call the consent mode API (the tag or data layer command) to update storage flags to ‘granted’ or ‘denied’ accordingly. Think of it like opening a gate: we start closed, the visitor hands us the key via the consent signal, and then we either open the gate fully, partially (allow aggregated hits), or keep it closed. If you use a tag manager, create a reusable trigger that fires only when the consent state allows the corresponding category so that pageviews, conversion pixels, and ad tags all follow the same rulebook.
How do you confirm you did this right? Simulate the common states — accept, deny, and delayed decision — on a staging site while watching the Network tab and the analytics debug view. Look for three outcomes: tags should not send personal identifiers when storage is denied, events that occur before a decision should be queued or marked for replay (if you configured queuing), and once consent is granted those queued events should either replay or be logged as intentionally dropped with a reason. Ask yourself: are conversions showing up in a debug view when consent is granted later? If not, trace the consent signal into the data layer and confirm the tag manager reads it before firing.
Finally, expect a few gotchas and plan accordingly so your analytics become resilient. Race conditions are the usual culprit, so keep consent initialization early in the page, use short replay timeouts so events aren’t held forever, and document which tags map to which consent categories so product teams know what changes when someone denies statistics or marketing. Building this bridge between privacy and measurement isn’t a one-time task; it’s a small engineering discipline that pays off by restoring trustworthy analytics while honoring visitors’ choices. With that in place, we can move on to concrete code patterns for queuing and replaying events so nothing important is lost.
Integrate with Google Tag Manager
You’ve already seen how consent signals and a CMP can pause or block analytics, and now we need the piece that orchestrates those sensors: Google Tag Manager (GTM). Think of GTM as the stage manager for your analytics and marketing scripts — it decides when each small script (a tag) runs based on signals it reads from the page. Building on what we covered about consent categories and Consent Mode, our job here is to teach GTM to wait for, understand, and act on the CMP’s consent object so your analytics stop vanishing mid-session.
Start by making the consent object visible where GTM expects it: the dataLayer. The dataLayer is a shared message bus on your page that your CMP and GTM use to talk to each other; when the visitor chooses preferences your CMP should push an event like consent_update with the structured consent state into that layer. Once that push happens, GTM can read which categories are allowed (for example: statistics or marketing) and use that truth to gate tags. Treat the dataLayer push as the single source of consent truth so every tag follows the same rulebook.
Next, create reusable signals inside GTM so you don’t rewrite logic for every tag. In GTM terms, a trigger is the rule that makes a tag fire and a variable is the piece of data the trigger inspects; build a consent_granted custom event trigger that fires only when the dataLayer consent object shows the statistics category is allowed. Then create a consent-state variable that returns boolean values for each category (true/false for statistics, marketing). With that mapping you can attach the same trigger or variable check to your GA4, conversion, and testing tags so they all behave consistently when consent changes.
We need to avoid lost early interactions, so use a queuing-and-replay pattern inside GTM rather than blunt blocking where possible. If a visitor converts before making a choice, have your front-end push the event into a local queue (for example a short-lived in-memory array or localStorage) and push a small marker into the dataLayer. When consent arrives, GTM’s consent_granted trigger should fire a lightweight replay tag that reads queued events and re-pushes them into the dataLayer for regular tags to handle. This approach preserves pageviews and conversions that would otherwise disappear while still honoring the user’s later decision.
If you run a server-side container, take advantage of it as a privacy-aware proxy. A server-side container collects hits from the browser, strips or hashes identifiers when storage is denied, and only forwards enriched hits once consent is granted. In practice, that means configuring your client-side GTM to send minimal measurement data to your server endpoint when consent is denied, then letting the server merge or augment queued interactions once permission arrives. This pattern reduces fingerprinting risk while keeping aggregated analytics useful.
How do you verify the wiring works? Use GTM’s Preview mode and watch the dataLayer timeline as you simulate accept, deny, and delayed responses. In Preview mode confirm that: (1) the consent object is pushed early, (2) tags that require statistics don’t fire when denied, (3) queued events are replayed after consent, and (4) network calls to analytics endpoints either include or omit identifiers as your consent policy dictates. Checking the Network tab and your analytics provider’s debug view while toggling consent states will quickly reveal race conditions or duplicate firing.
Finally, expect a few practical gotchas and document them. Initialize consent logic as early as possible to avoid race conditions, set a replay timeout so events aren’t stored forever, and keep a consistent naming scheme for consent events and variables so engineers and analysts can inspect behavior quickly. Building this GTM layer gives you a single place to map consent categories to tags, which both stabilizes your analytics and makes future audits and experiments much easier to reason about.
Taking this integration further, the next step is to show concrete code patterns to buffer events and replay them responsibly so nothing important is lost while respecting user privacy.
Implement server-side and cookieless tracking
Imagine you’ve already wired your CMP and Google Tag Manager and still see holes in your reports after the cookie consent banner appears — that’s the moment server-side tracking and cookieless tracking become your allies. Right away, think of server-side tracking as moving the recorder off the noisy stage (the browser) into a quiet control room you run (your server). Cookieless tracking, meanwhile, is a set of techniques that measure behavior without relying on third-party cookies or cross-site identifiers. Building on what we already covered about consent signals and queuing, these approaches help preserve analytics fidelity while respecting visitor choices.
Start by meeting the main actor: server-side tracking. The topic sentence here is simple — server-side tracking routes event hits from the browser to your backend, and then your backend forwards sanitized hits to analytics providers. This gives you a single place to read the CMP’s consent signal, remove or hash identifiers when storage is denied, and control retries, deduplication, and enrichment without exposing third-party endpoints to the browser. Because the server is authoritative, you reduce race conditions, avoid blocked client-side scripts, and can implement replay logic or short-lived first-party identifiers that improve accuracy for consented sessions.
Now let’s introduce cookieless tracking as a cast of privacy-respecting techniques rather than a single API. The core idea is to capture minimal, non-identifying signals or aggregated metrics when users decline cookies, and only escalate to richer identifiers after consent. Examples include short-lived first-party IDs scoped to a domain, hashed event IDs for deduplication, and server-aggregated conversions that don’t store PII. These methods let you preserve conversion counts and funnel metrics for analytics while avoiding persistent cross-site trackers, which also helps with compliance and reduces privacy risk.
So how do you implement this in practice? First, have the client push every relevant event into the dataLayer and into a local, ephemeral queue (in-memory or sessionStorage) with a small TTL. Second, send a lightweight, consent-aware beacon to your server-side endpoint immediately: when consent is denied, the beacon contains only non-identifying attributes and an opaque event ID; when consent is granted, the full enriched payload is allowed. On the server, map the CMP’s consent categories to forwarding rules, strip or hash identifiers where required, and store queued events only long enough to allow replay once permission arrives. This architecture keeps events safe, traceable, and reversible according to the user’s choices.
Practical safeguards matter: deduplicate with event IDs so replayed hits don’t double-count, set clear replay timeouts (for example, 24–72 hours depending on your product and compliance requirements), and log consent transitions for audits. Avoid browser fingerprinting techniques that try to reconstruct identities when consent is denied — those increase legal and ethical risk. Instead, prefer aggregated reporting on the server (counts, conversion rates, cohorts) and use hashed or ephemeral first-party identifiers only when explicitly allowed by the consent state to preserve analytics quality without compromising privacy.
How do you verify that server-side and cookieless tracking actually improve your numbers without breaking consent? Test on staging by simulating accept, deny, and delayed decisions while watching your server logs, network calls, and analytics debug views. Confirm that events pushed before a decision are either replayed after consent, recorded as aggregated non-identifying metrics when denied, or dropped with a recorded reason. Use A/B-style checks—compare committed conversions from the server pipeline to client-side debug logs—to catch missing replay or deduplication bugs.
Taking these steps turns a brittle client-only measurement system into a consent-aware, resilient pipeline: server-side tracking centralizes control, cookieless tracking preserves high-level analytics, and careful queuing and replay preserves user intent without violating choices. Building on our earlier work with CMPs, Consent Mode, and GTM, this approach reduces dropped pageviews and lost conversions while keeping privacy front and center. Next, we’ll show concrete code patterns for queuing and safe replay so you can implement the flow end-to-end.