Assess VRAM Constraints (docs.pytorch.org)
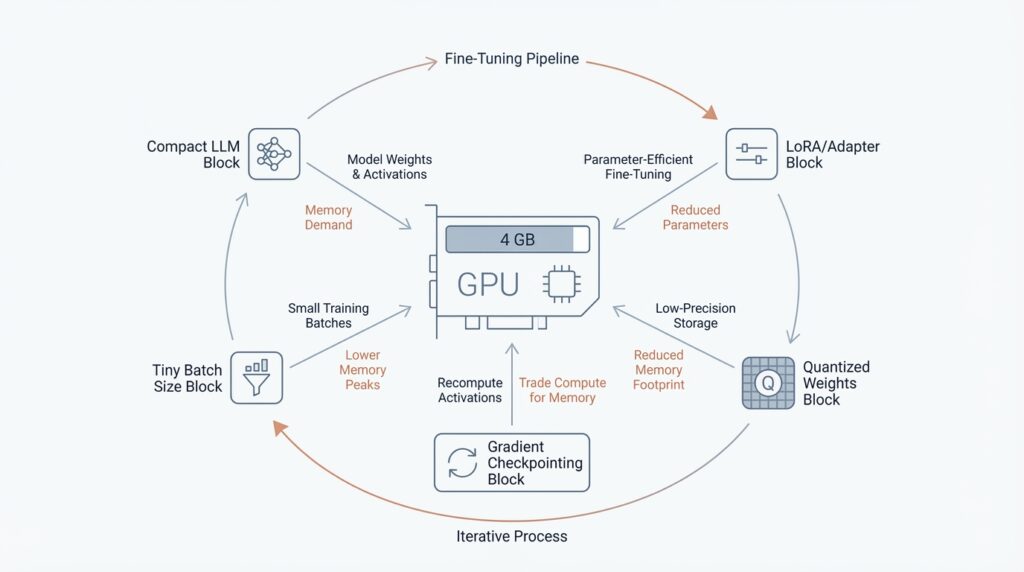
When you start fine-tuning on a 4 GB GPU, VRAM, the GPU’s working memory, becomes the whole story. Think of it like a small table: before you can cook, every ingredient has to fit on it at once, and training asks for several ingredients at the same time. PyTorch’s memory tools matter here because they help you see whether the pressure is coming from weights, gradients, optimizer state, or activations before the run falls over.
The key thing to understand is that training memory is not one single pile. PyTorch breaks it into model parameters, activations saved for the backward pass, gradients that are the same size as the parameters, and optimizer state that is proportional to the parameters; for Adam, that state is about twice the parameter size. In a normal step, the weights are already sitting in VRAM before forward starts, activations grow during the forward pass, gradients build during backward, and the optimizer state often appears during the first optimizer step and then stays there. That is why the peak can arrive later than you expect, sometimes right when the optimizer kicks in.
How do you tell whether a model can fit? Start with the simplest arithmetic. torchtune notes that bfloat16 uses 2 bytes per model and optimizer parameter, while fp32 uses 4 bytes, so a model with 1 billion parameters already needs about 2 GB just for the weights in bfloat16. On a 4 GB card, that leaves very little room for gradients, optimizer state, and activations, which means full fine-tuning can become cramped long before you increase batch size or context length. In other words, VRAM constraints are not only about model size; they are also about how many training tensors have to live together at the same time.
This is where activation checkpointing enters the story. PyTorch describes activation checkpointing as a trade of compute for memory: instead of keeping every intermediate tensor from the forward pass, it saves only what it must and recomputes the rest during backward. That makes it especially useful when you are memory constrained and want more room for batch size or longer context lengths, but the cost is extra compute and slower training. So if your first attempt OOMs, checkpointing is often the lever that buys breathing room without changing the model itself.
The most practical move is to measure, not guess. PyTorch’s Memory Snapshot and Memory Profiler show which category dominates, and they make it obvious when gradients are being cleared, when optimizer state appears after the first iteration, or when activations climb toward the backward pass peak. Once you see the dominant bucket, you can decide whether the next constraint to ease is sequence length, batch size, precision, or activation checkpointing. That diagnosis is the bridge from “it does not fit” to “now we know why.”
Load a Compatible Base Model (huggingface.co)
Building on this foundation, the next question is not how big the model is, but whether the base model can be loaded in a way bitsandbytes understands. How do you know if a model is compatible? Look for one that Hugging Face can load through from_pretrained(), that works with Accelerate, and that uses standard torch.nn.Linear layers—the dense layers bitsandbytes knows how to replace with 4-bit or 8-bit versions. In practice, that means a familiar transformer-style architecture is usually the safest starting point, while unusual custom modules may need extra care.
import torch
from transformers import AutoModelForCausalLM, BitsAndBytesConfig

quantization_config = BitsAndBytesConfig(
    load_in_4bit=True,
    bnb_4bit_quant_type="nf4",
    bnb_4bit_compute_dtype=torch.bfloat16,
)

model = AutoModelForCausalLM.from_pretrained(
    model_id,
    quantization_config=quantization_config,
)
When you are fine-tuning on a 4 GB GPU, 4-bit is usually the friendlier fit because it compresses more aggressively than 8-bit and leaves more room for the pieces of training that still need memory. Hugging Face specifically recommends NF4 for training 4-bit base models, and if your hardware supports it, bfloat16 is the preferred compute dtype because it keeps float32-like numerical stability while using the memory footprint and speed benefits of a 16-bit format. That combination gives the backbone enough breathing room for adapters, activations, and gradients.
There is one catch that matters a lot here: training with 8-bit or 4-bit weights is only supported for training extra parameters. That is why QLoRA keeps the base model frozen and learns small LoRA adapters on top, instead of trying to rewrite every weight in the network. If you were hoping for full fine-tuning, this is the moment to adjust the plan; on a tiny card, the compact backbone plus trainable adapters is the realistic path.
This is also where device_map stops being a vague convenience and starts becoming a placement decision. For inference, device_map="auto" can help spread a quantized model across available devices, but the training docs are more careful: for fine-tuning, PEFT can load the model onto the GPU directly, and device_map="auto" is meant mainly for inference. If the model still does not fit, the problem is often not the quantizer itself but the mix of architecture, placement, and the amount of memory you are asking the card to hold at once.
If you are unsure what to pick, begin with a model that already loads cleanly through Transformers and uses ordinary linear layers, then confirm that your hardware matches the quantization mode you want. On NVIDIA GPUs, bitsandbytes supports NF4/FP4 quantization on Pascal or newer cards, while LLM.int8() needs Turing or newer. So when a model refuses to cooperate, the mismatch is often not the model card itself but the gap between architecture, hardware, and the kind of 4-bit or 8-bit loading you are attempting.
Quantize with NF4 (huggingface.co)
Building on the memory pressure we already mapped, NF4 is the moment when we stop asking a 4 GB GPU to carry a full-precision model and start asking it to carry a smaller, more workable version. NF4 means Normal Float 4, a 4-bit data type from the QLoRA paper, and Hugging Face recommends it for training 4-bit base models because it is designed for weights that start out with a roughly normal distribution. If you are wondering, “How do you quantize with NF4 without losing the plot?”, the idea is that NF4 shrinks the frozen backbone first, so there is still room left for the parts that actually need to learn.
The practical setup is a small trio of settings that work together: load_in_4bit=True, bnb_4bit_quant_type="nf4", and usually bnb_4bit_compute_dtype=torch.bfloat16. That last piece matters because Hugging Face describes bfloat16 as the faster compute format to use during 4-bit training, which lets the model store weights in 4 bits while doing the math in a friendlier 16-bit format. In plain language, we keep the pantry tiny, but we still cook with a reliable stove.
NF4 matters because it fits the QLoRA pattern, and that pattern is the real trick behind making tiny GPUs feel less tiny. PEFT explains that quantization becomes trainable again when we add only extra trainable parameters, and QLoRA does exactly that by compressing the model to 4 bits and then training LoRA, short for low-rank adaptation, on top. There is an important limit here: Hugging Face says 8-bit and 4-bit training is only supported for training extra parameters, so NF4 is not a route to full fine-tuning every weight. It is the route to keeping the base model frozen while the adapters learn the task.
That is why NF4 feels so effective on constrained hardware. Instead of turning every layer into a memory burden, we compress the backbone and let the adapter layers do the learning work, which is far lighter on VRAM. Hugging Face also lists NF4/FP4 support on NVIDIA Pascal or newer GPUs, so the technique reaches back to much older cards than many people expect. This is the encouraging part of the story: you are not chasing the biggest possible model anymore, only the smallest version that still behaves like the model you wanted.
One detail that saves a lot of confusion is placement. For fine-tuning, PEFT says the model loads directly onto the GPU, and device_map="auto" is meant mainly for inference, not training. So if an NF4 model still refuses to fit, the problem is usually not the quantization type alone; it is the combination of sequence length, adapter size, activations, and the rest of the training stack. NF4 buys you room, but it does not erase every other memory bill.
So the mental model stays simple: first trim the backbone with NF4, then let LoRA learn the task, then check whether bfloat16 and your other training settings are helping the fit. Once that clicks, the rest of the pipeline becomes much easier to reason about, because you can tell which tensors are frozen, which tensors are learning, and why the 4 GB limit is now survivable instead of mysterious. From there, we can move on with a clearer picture of which adapter layers deserve the learning budget.
Add LoRA Adapters (huggingface.co)
Building on this foundation, we now add the learning layer on top of the frozen NF4 backbone. Low-Rank Adaptation, or LoRA, works by inserting two small matrices into selected weight matrices while leaving the original weights frozen, so the model learns a task-specific change without rewriting the whole network. In transformer models, PEFT typically applies these adapters to attention blocks, and the appeal is practical: far fewer trainable parameters, portable adapters, and no inference latency once the adapters are merged back into the base model.
How do you decide where those adapters go? This is where target_modules becomes the steering wheel. For many language models, a good starting point is the attention projections, while QLoRA-style setups often target all linear layers with the all-linear setting when you want the broader adaptation pattern Hugging Face shows in its examples. The size of each adapter is governed mainly by r, the rank, so a smaller rank gives you fewer trainable parameters; lora_alpha controls scaling, lora_dropout adds regularization, and bias='none' keeps the footprint lean.
Once the shape of the adapter is clear, the actual wiring is short and readable. We define a LoraConfig, then wrap the base model with get_peft_model() to turn only the adapter weights into trainable parameters. If you are working with a quantized model, PEFT’s training flow also recommends preparing the model for k-bit training first, and print_trainable_parameters() is a handy checkpoint that shows whether the adapter slice is really as small as you intended.
from peft import LoraConfig, get_peft_model, prepare_model_for_kbit_training

model = prepare_model_for_kbit_training(model)

config = LoraConfig(
    r=8,
    lora_alpha=16,
    target_modules=['q_proj', 'v_proj'],
    lora_dropout=0.05,
    bias='none',
    task_type='CAUSAL_LM',
)

model = get_peft_model(model, config)
model.print_trainable_parameters()
That small pattern is the heart of LoRA adapter training: freeze the backbone, attach the adapters, and let the tiny trainable slice carry the lesson. On a 4 GB GPU, this matters because the frozen weights stay in place while only the low-rank updates, plus any explicitly saved task head, need to participate in training. In other words, LoRA turns a memory-heavy rewrite into a lightweight overlay, which is exactly why it pairs so well with quantized models and the memory savings we mapped earlier.
There is one last detail that saves confusion later: adapters are not the end state, they are a working arrangement. During development, you can keep the PeftModel around, inspect the trainable parameter count, or swap adapters; when you want a standalone model for inference, merge_and_unload() folds the LoRA weights back into the base model so the result behaves like a single checkpoint. That is why adding LoRA adapters feels less like rebuilding the engine and more like clipping on a new gear: the base model stays intact, the adaptation stays compact, and you can choose when to merge the two worlds.
Enable Checkpointing (huggingface.co)
Building on the memory-saving steps we already put in place, checkpointing is the next lever you reach for when a 4 GB GPU still feels crowded. Think of it like cooking from a recipe card instead of keeping every ingredient on the counter: you keep the important inputs, but you let the intermediate steps be rebuilt later when you need them. In training, those intermediate steps are called activations, meaning the tensors produced as data moves through the network, and gradient checkpointing lets us free more of them during the forward pass so the backward pass can recompute them later.
That trade is the whole trick. PyTorch explains that activation checkpointing keeps only the needed inputs, drops the unsaved intermediate tensors, and recomputes them during backward propagation, which lowers peak memory at the cost of extra compute. Hugging Face says the same idea in trainer terms: gradient checkpointing clears activations during forward and recomputes them during backward, usually saving memory while making training slower by about 20%.
So how do you turn it on in practice? If you are using the Transformers Trainer, you can pass gradient_checkpointing=True in TrainingArguments, and if you are working with a model object directly, Hugging Face exposes model.gradient_checkpointing_enable(). For PEFT and quantized setups, prepare_model_for_kbit_training() also includes gradient checkpointing by default, and it accepts gradient_checkpointing_kwargs if you need to forward options to PyTorch’s checkpoint function. That means the switch usually lives close to the rest of your training setup, not buried deep in custom code.
from transformers import TrainingArguments
from peft import prepare_model_for_kbit_training

model = prepare_model_for_kbit_training(model)

training_args = TrainingArguments(
    output_dir="./out",
    per_device_train_batch_size=1,
    gradient_checkpointing=True,
)

model.gradient_checkpointing_enable()
If you use PyTorch’s low-level checkpoint API yourself, there is one detail worth noticing: PyTorch recommends use_reentrant=False, and it also warns that the forward and backward recomputation must behave the same or gradients can become wrong. In plain language, checkpointing is safe when the model path stays stable, but it can get shaky if your code changes behavior between passes because of randomness or other hidden state. That is why checkpointing is powerful, but also why we treat it like a deliberate engineering choice rather than a magic flag.
One more small setting matters here: training usually does not need the model’s cache, which stores past key values for faster generation. Hugging Face’s Trainer docs note that use_cache is usually unnecessary during training except for some PEFT methods, so turning it off keeps the training path leaner and avoids carrying around memory you will not use. When checkpointing is enabled, that little bit of discipline helps the freed VRAM go toward the things that actually learn, like your LoRA adapters and your activations.
Once this switch is on, the shape of the problem changes. You are no longer asking the GPU to remember every intermediate thought, only to remember enough to replay the important ones later. That extra breathing room is what makes the next tuning decisions—batch size, sequence length, and precision—feel like choices instead of emergencies.
Use Paged Optimizers (arxiv.org)
Building on this foundation, paged optimizers are the last safety net we reach for when the model, LoRA adapters, and checkpointing still leave the GPU feeling crowded. The reason is hidden in the optimizer state: Adam-style optimizers keep moving averages of past gradients, and that state uses memory that could otherwise hold parameters or activations. QLoRA adds paged optimizers specifically to manage memory spikes, which is why they matter so much on a 4 GB card. How do paged optimizers help when the model already fits most of the time? They keep the run alive when one heavy step pushes memory over the edge.
The mechanism is a little like moving extra pots to a shelf just outside the kitchen. Paged optimizers are built on CUDA unified memory, a shared memory space that both GPU and CPU can access, and bitsandbytes adds this behavior because PyTorch does not provide it there. When GPU memory runs out, optimizer pages move page-by-page from GPU to CPU, and the CPU side is preallocated so the spill can happen without redesigning the whole training loop. In other words, a paged optimizer only wakes up when it is needed.
That design gives you a gentler failure mode, but it is not free. The docs say unified memory is less efficient than ordinary asynchronous transfers, so an optimizer step can slow down when memory gets evicted across PCIe, the high-speed lane connecting the GPU and CPU. The trade-off is still attractive on a tiny GPU because you pay overhead only for the memory that actually spills; compared with full CPU offloading, a paged optimizer keeps zero overhead when everything fits and adds only partial overhead when it does not. For small fine-tuning runs, that difference can matter more than raw speed.
In practice, you usually meet paged optimizers through bitsandbytes and the Transformers Trainer. Hugging Face lists paged variants such as PagedAdam, PagedAdamW, PagedAdamW8bit, and PagedAdamW32bit, and the Trainer can use them directly with an optim setting like paged_adamw_32bit. That makes paged optimizers feel less like a special research trick and more like a drop-in setting beside the quantization and LoRA choices we already made. If you have been wondering where this fits in the stack, this is the point where the training recipe starts to look practical rather than theoretical.
The best time to reach for paged optimizers is when your run is almost stable, but occasional spikes still trigger an out-of-memory crash. That is my inference from the docs’ zero-overhead-when-it-fits behavior and the QLoRA paper’s emphasis on memory spikes: if the model, adapters, and activations already sit comfortably below the limit, paging may only add unnecessary latency, but if the run dies on a few heavy steps, it can be the difference between repeated crashes and a usable training loop. So when you see one last stubborn OOM after quantization, LoRA, and checkpointing, paged optimizers are often the quiet partner that lets the rest of the stack do its job.