Meet the Table
Before we can write a single SQL query, we need a place to imagine our data living. That place is the SQL table, and it is the heart of almost every database you will meet. If a database feels like a neatly organized notebook, the table is one page of that notebook, filled with related facts that belong together. What is a SQL table, really? It is the structure that stores data in rows and columns, which gives us a tidy way to read, search, and update information without turning the whole system into a mess.
The easiest way to picture a database table is to think of a simple spreadsheet, but with a stronger sense of purpose. Each column holds one kind of detail, such as a name, email address, or price. Each row holds one complete item, called a record, which means one individual entry in the table. So if we were tracking books, one row might describe one book from start to finish, while the columns would tell us its title, author, and year. That structure is what makes SQL feel so orderly once you get used to it.
This is where the story starts to feel real, because a table is not just a pile of text. It is a carefully shaped container that helps the database understand what belongs where. A field is the value inside one cell of the table, like the specific author name in one row and one column. A database table also keeps related data together, which means we do not repeat ourselves every time we need the same kind of information. Instead of scattering details across random notes, we place them side by side so SQL can find them again in a predictable way.
Now that we can picture the layout, the next question is how the table stays consistent. In most cases, one column acts like the table’s name tag for each row; this is often called a primary key, which is a value that uniquely identifies one record. You do not need to master that idea right away, but it helps to know why tables feel so dependable. The database uses these rules like a librarian uses shelf labels: every book has a place, and every place has a meaning. That is how a SQL table keeps order even when it grows large.
You might wonder why this matters if we are only learning the basics. The answer is that every useful SQL query starts by understanding the table you are asking. When you later say, “show me all the customers,” SQL needs to know which table holds customers, which column stores their names, and which row belongs to which person. Once you see the table as a map of real information, the language of SQL stops looking mysterious and starts looking practical. The database table becomes less like code and more like a conversation with organized data.
There is also a quiet comfort in the table’s simplicity, and that matters for beginners. You do not need to memorize a giant system all at once; you only need to learn how one table holds one kind of story. A table for students looks different from a table for orders, but both follow the same idea: rows describe individual things, and columns describe their properties. That shared pattern is what makes SQL table design so powerful, because once we learn one table, we can recognize the shape again and again.
As we move forward, keep this picture close: a table is the room where the data lives, and each row and column gives that room a clear structure. When we later ask SQL to fetch, change, or add information, we will always be working with this same foundation. For now, the important thing is not to chase every detail, but to feel at home with the layout. Once the table makes sense, the rest of the journey starts to unfold naturally.
Write Your First Query
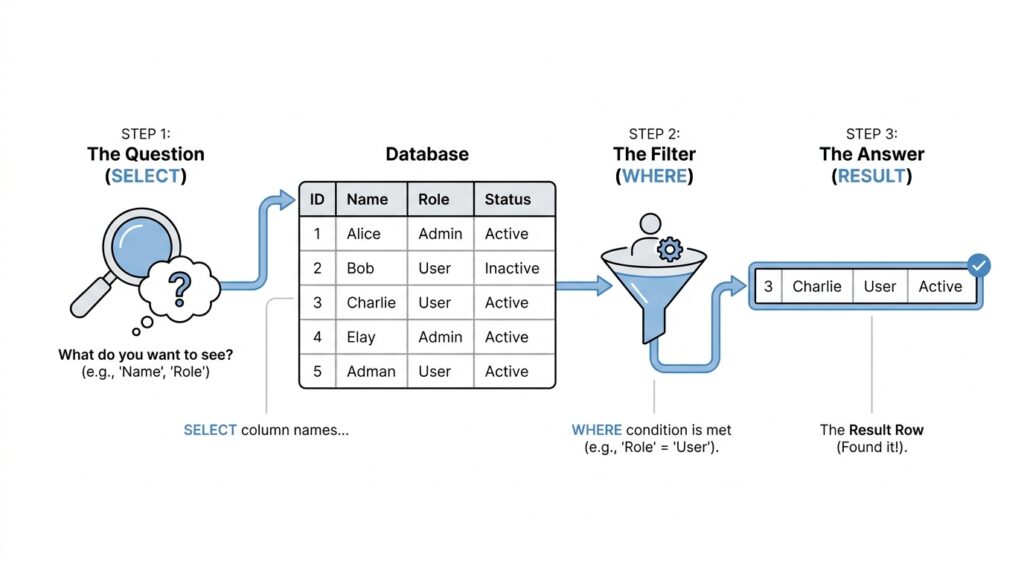
Now that the table feels familiar, we can finally open the door and ask it a question. A SQL query is the sentence we write to tell the database what we want, and the most common place to begin is with a SELECT statement, which means “show me this data.” If you have ever wondered, how do I write my first SQL query?, this is the moment where the answer starts to feel concrete. We are no longer staring at a room full of organized data; we are learning how to speak to it.
A first SQL query often feels a little like pointing at a shelf in a library and asking for a specific book. We already know the table is the room where the data lives, so our job now is to name the table and tell SQL which columns we want to see. The basic shape looks like this: SELECT comes first, then the pieces of information we want, and then FROM, which tells the database where to look. That small pattern is the backbone of many SQL query examples you will see later.
Here is the simplest version, and it is a great place to start:
SELECT *
FROM books;
This query says, “show me every column from the books table.” The asterisk (*) is a wildcard, which is a symbol that means “all columns.” At first, that little star can feel mysterious, but in this case it is only a shortcut for asking the database to bring back the full row of information. The semicolon at the end marks the end of the statement, like a period at the end of a sentence.
Now let’s slow down and look at the parts one by one. SELECT is the action word, and FROM is the direction word. Between them, we choose what we want to see, and after FROM, we name the table we want it from. If the books table has columns like title, author, and year, then this first SQL query returns all of them for every book stored there. That is why SQL feels so practical: it turns a vague question into a clear request.
Once you are comfortable with that shape, you can make the query more specific. Instead of asking for everything, you can ask for only the columns you care about, which keeps the result easier to read. For example, if you only want the book titles and authors, you might write:
SELECT title, author
FROM books;
This version is still a SQL query, but it is more focused. We are telling the database to leave out the extra details and bring back only the columns that matter for this moment. That kind of narrowing is one of the first habits that makes SQL feel less overwhelming, because you begin by looking at a smaller, cleaner result.
The next piece of the story is that queries can also ask for rows that meet a condition. A condition is a rule that filters the data, like asking only for books published after a certain year. You do not need to master filtering right away, but it helps to know that SELECT is only the first part of a larger conversation. In many real situations, a first SQL query grows into a smarter one once you decide which rows should stay and which should be left out.
For now, the main win is learning the rhythm. You have seen the shape of a SQL query, you have watched SELECT and FROM work together, and you have met the asterisk as a way to ask for everything in a table. That is enough to get you started with confidence, because the structure will keep showing up as we add more pieces. Once this first query feels familiar, the rest of SQL starts to look less like a wall of code and more like a language you can already begin to use.
Filter the Right Rows
Now that we can ask for data, the next step is learning how to ask for the right data. This is where SQL row filtering becomes useful, because a table can hold hundreds or thousands of rows, and we rarely want all of them at once. If you have ever searched a closet for one blue jacket instead of emptying the whole shelf, you already understand the idea behind the WHERE clause: it helps us keep only the rows that match what we need. That is what turns a broad SQL query into a focused one.
The WHERE clause is the part of a query that sets the rules. In plain language, it says, “Only return rows that satisfy this condition.” A condition is a statement that can be true or false, such as “the year is 2020” or “the author is Maya.” When the condition is true for a row, SQL keeps it; when it is false, SQL leaves it out. So if you are wondering, “How do I filter rows in SQL?”, the answer starts here with the SQL WHERE clause.
Here is the shape of a filtered query:
SELECT title, author
FROM books
WHERE year = 2020;
This query asks for the titles and authors of only the books published in 2020. The SELECT part chooses the columns we want, FROM names the table, and WHERE acts like a gatekeeper for the rows. Notice how the query still feels familiar, but now it has a new layer of intention. We are not just opening the door to the table; we are standing at the door and checking each row against a rule.
The interesting part is that the condition lives on the same level as a simple fact. year = 2020 means the year must equal 2020, and that equal sign is a comparison operator, which is a symbol that compares two values. SQL uses comparison operators like =, >, <, >=, and <= to decide whether a row belongs in the result. If a row says year = 2018, it does not pass this rule, so it stays behind while the matching rows come through.
We can also make the filter more human by choosing meaningful values. Imagine a table of customers, and you want only the people from Chicago. You might write WHERE city = 'Chicago', and the single quotes tell SQL that Chicago is text, not a number or a column name. That tiny detail matters because SQL needs to know what kind of value it is comparing, and getting that language right helps your SQL query behave the way you expect. Little by little, these pieces begin to feel less like syntax and more like instructions.
The WHERE clause also becomes useful when the rule is not about one exact match. Suppose you only want books published after 2015, or orders above a certain price. Then you can write WHERE year > 2015 or WHERE total > 50, and SQL will keep only the rows that satisfy that comparison. This is a powerful habit because it lets you focus on patterns, not just exact values. Instead of saying “give me everything,” you start saying “give me everything that fits this shape.”
As your queries grow, the SQL WHERE clause can handle more than one rule at a time. You can combine conditions with AND, which means both rules must be true, or OR, which means either rule can be true. That might look like WHERE city = 'Chicago' AND year = 2020, which keeps rows only when both details match. This is where filtering starts to feel like real decision-making, because you are no longer asking for a list; you are describing a situation.
The main thing to remember is that filtering does not change the table itself. It only changes what the query returns, like shining a flashlight on one part of a room instead of turning on every light at once. That distinction matters because SQL row filtering helps you inspect data without disturbing it. Once this idea clicks, the WHERE clause becomes one of the most useful tools in your SQL toolkit, and every new query will feel a little more precise.
Join Related Tables
Now that we can read a single table and filter its rows, we reach the moment where SQL starts to feel like a real conversation: what if the answer lives in more than one place? That is where joining related tables comes in. A JOIN lets us combine rows from two tables into one result, and SQL matches those rows by comparing values in a join condition, often a primary key in one table and a foreign key in another. In other words, one table carries the stable identifier, and the other table points back to it like a bookmark.
If you have ever asked, “How do I join related tables in SQL without getting lost?”, the safest way is to start with a simple story. Imagine a customers table that stores each customer once, and an orders table that stores each purchase with a customer_id. The customer_id in orders is a foreign key, which means it must match a value in the referenced table, and that relationship keeps the data connected and consistent. Once those two tables share that common key, SQL can stitch them together instead of making you repeat customer details in every order row.
The most common place to begin is an INNER JOIN, which keeps only the rows that match on both sides. PostgreSQL’s documentation describes it as returning a row for each row in the first table that satisfies the join condition with a row in the second table, which makes it a good choice when you want only pairs that truly belong together. That means if a customer has no orders, or an order points to no matching customer, the row does not appear in the result. Here is the basic shape:
SELECT customers.name, orders.order_id
FROM customers
INNER JOIN orders
  ON customers.customer_id = orders.customer_id;
This query says, “give me only the customers and orders that match on customer_id.” The ON clause is the join condition, and MySQL’s documentation notes that this is where we specify how the tables should match, while WHERE is used to narrow the rows after the join. That small difference matters, because the join condition is the bridge between the tables, while filtering is the gate that decides which combined rows stay in the final result.
Sometimes, though, we do not want to lose rows that do not have a match. That is when a LEFT JOIN becomes the gentler option. A left join keeps every row from the left table and fills in missing columns from the right table with NULL, which is SQL’s way of saying “no value here.” So if we left join customers to orders, we can still see customers who have never placed an order, and the order columns will simply come back empty.
That difference between INNER JOIN and LEFT JOIN is worth feeling in your hands, because it changes the story the data tells. An inner join is like asking, “Which pairs actually meet?” A left join is like asking, “What does the whole customer list look like, even when some customers have not ordered yet?” Both are useful, but they answer different questions, and choosing the wrong one can quietly hide information you meant to keep.
As you practice joining related tables, keep one habit close: name the relationship before you write the query. Ask yourself which column uniquely identifies a row, which column points back to it, and whether you want only matched rows or every row from the first table. That little pause gives your SQL query direction, and it turns joins from a scary-looking syntax puzzle into a practical way of reconnecting pieces of the same story.
Group and Summarize
Now that we can filter rows, we reach the point where the data starts asking for a different kind of attention: not one row at a time, but patterns across many rows. This is where SQL GROUP BY and aggregate functions come in, and they help us summarize data instead of staring at every individual record. If a table feels like a stack of receipts, grouping is the moment we start bundling those receipts into neat piles so we can see the bigger picture. It is the natural next step when you ask, “How do I group and summarize rows in SQL?”
To make that idea feel real, imagine an orders table with one row per purchase. If we want to know how many orders each customer placed, reading row by row would be slow and awkward, like counting coins one by one on a crowded table. SQL gives us a better path by letting us group rows that share the same value, such as the same customer_id, and then calculate one result for each group. That is what the GROUP BY clause does: it gathers matching rows into clusters so we can ask a summary question about each cluster.
A summary question usually uses an aggregate function, which is a function that combines many rows into one answer. Common examples are COUNT, which tells us how many rows are in a group, SUM, which adds numbers together, AVG, which finds the average, MIN, which finds the smallest value, and MAX, which finds the largest. These names may sound technical at first, but they are really just tools for turning a crowd of values into one clear number. In SQL aggregation, that shift from many rows to one result is the whole trick.
Here is a simple example:
SELECT customer_id, COUNT(*)
FROM orders
GROUP BY customer_id;
This query says, “For each customer, count how many order rows belong to them.” The GROUP BY customer_id part tells SQL how to bundle the rows, and COUNT(*) tells it what summary to produce for each bundle. The asterisk here means “count every row in the group,” which is a convenient way to measure how many records each customer has. Instead of one long list of orders, we get one line per customer, which makes the result much easier to read.
One detail that helps beginners is this: every column in the SELECT list must either be grouped or aggregated. That means if we ask SQL to summarize by customer, we can show the customer name if it is part of the grouping, but we cannot casually include a random order date unless we also summarize it. This rule keeps the result tidy, because SQL needs to know whether a value represents the whole group or just one row inside it. It can feel strict at first, but it protects us from confusing answers.
We can also use grouping to answer richer questions. Suppose we want the total sales per category instead of the total orders per customer. We might write SUM(price) to add up the values in each category, or AVG(price) to find the average price in each group. That is where summarize data in SQL becomes powerful: we stop counting raw rows and start seeing trends, like which category earns the most or which group tends to have the highest average. The query becomes less like a list and more like a report.
Sometimes we want to filter after grouping, and that is where the HAVING clause appears. HAVING works like WHERE, but it filters groups instead of individual rows, which matters when we want only customers with more than three orders or only categories with a total above a certain amount. So if WHERE helps us choose rows before grouping, HAVING helps us choose groups after the summary is built. That small distinction is one of those SQL ideas that feels tricky at first, but once it clicks, the logic becomes very clear.
As you practice SQL GROUP BY, keep the story in mind: rows first become groups, and groups then become answers. We are no longer asking the database to show us everything; we are asking it to help us understand what the data means. That is the heart of summarizing, and it is one of the reasons SQL feels so useful in real life. Once this pattern feels familiar, we can start shaping the results even further and make the output easier to read and compare.
Practice with Examples
Now that the pieces are on the table, the best way to make them stick is to practice with examples and watch SQL move from idea to action. When you first start, a query can feel like a row of unfamiliar knobs, but examples turn those knobs into something you can touch and test. If you are asking, how do I practice SQL with examples?, the answer is to begin with tiny questions and let each query answer one clear thing.
A good habit is to keep one simple table in mind and change only one part of the query at a time. That way, you can see exactly what each word does, instead of trying to understand everything at once. For example, if we use the books table from earlier, we can start with a plain SQL query example that shows every row and every column.
SELECT *
FROM books;
This is a helpful first practice query because it shows you the whole shape of the data. The star means “all columns,” and the result gives you a full snapshot of the table. Once you see that working, you can narrow the view and notice how SQL changes the result without changing the data itself.
SELECT title, author
FROM books;
This version is one of the simplest SQL query examples for beginners because it teaches focus. You are still looking at the same table, but now you are choosing only the columns you care about. That small shift matters because it teaches you that SQL is not only about finding data; it is also about shaping the answer so it is easier to read.
From there, practice gets more interesting when you add a filter. A WHERE clause, which we met earlier, helps you keep only the rows that match a rule, and that is where the query starts to feel useful in everyday life. If you want only books from one year, the query might look like this:
SELECT title, author
FROM books
WHERE year = 2020;
Now the query is doing two jobs at once. It chooses which columns to show, and it also narrows the rows down to a specific year. That is the pattern to notice: SQL asks one question about the columns, and another question about the rows, and both questions work together to give you a cleaner result.
Practice becomes even more valuable when you connect the ideas you have already learned. Imagine you have a customers table and an orders table, and you want to see who placed which order. A join lets you bring those tables together, and the example below shows how that looks in real SQL.
SELECT customers.name, orders.order_id
FROM customers
INNER JOIN orders
  ON customers.customer_id = orders.customer_id;
This is the kind of SQL query example that makes the logic feel alive. You are telling the database to match rows using a shared key, then return only the pairs that fit. If that still feels a little tricky, that is normal; joins often need a few tries before they start to feel natural, and that is exactly why examples matter.
You can also practice summary questions, which is where the table starts speaking in bigger patterns. Suppose you want to know how many orders each customer has placed. A grouped query gives you one result per customer instead of one result per order, and that change teaches you how SQL can move from detail to overview.
SELECT customer_id, COUNT(*)
FROM orders
GROUP BY customer_id;
This is one of the most useful SQL query examples because it shows how rows can become groups and then become answers. The COUNT(*) part gives you the total number of rows in each group, while GROUP BY tells SQL how to organize them. Once you can read this pattern, you begin to see that SQL is not memorizing syntax; it is learning how to ask sharper questions.
As you practice, try changing one piece and predicting the result before you run the query. What happens if you choose one column instead of two? What changes if you filter on a different year, or group by a different field? That kind of active practice is where SQL starts to feel less like a puzzle and more like a conversation, and every new example gives you another sentence you can speak with confidence.