What Is LiveKit Voice AI?
If you’ve ever wished a chatbot could hear you, think for a moment, and answer back in a natural voice, that’s the space LiveKit Voice AI lives in. In practice, people usually mean the LiveKit Agents stack: a framework and cloud platform for building voice, video, and physical AI agents that can interact with users over realtime audio, video, and data streams. It’s the piece that helps turn a text-based model into something that feels like a conversation instead of a typing exercise.
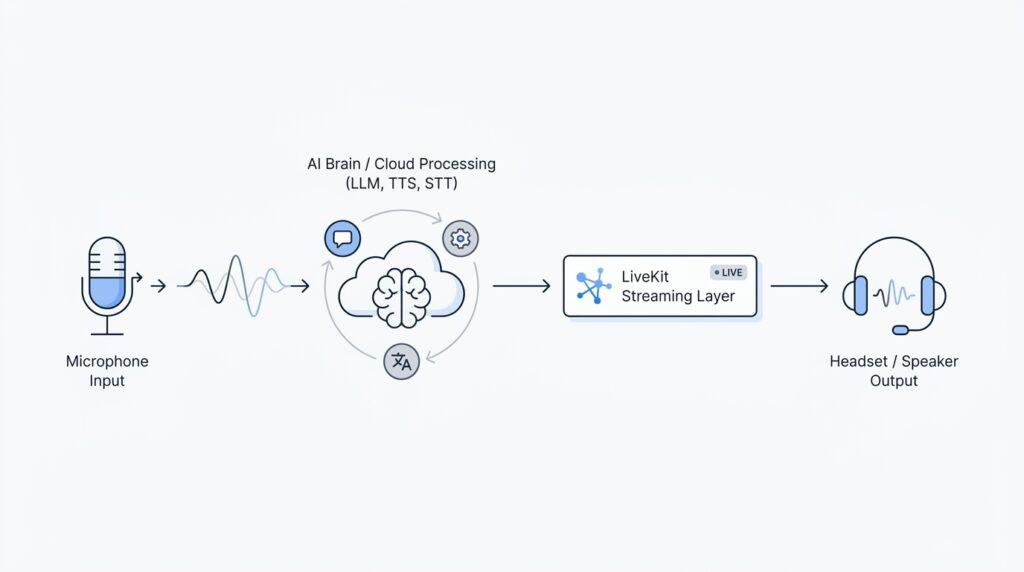
The easiest way to picture it is to imagine a tiny team working behind the scenes. One teammate listens to your words, another understands them, another writes the response, and a final one speaks it aloud. LiveKit Voice AI is the system that keeps that team coordinated. LiveKit’s docs describe support for both a classic speech pipeline made of speech-to-text (STT, which turns spoken words into text), a large language model (LLM, which reasons and generates text), and text-to-speech (TTS, which turns text into spoken audio), as well as realtime models that go directly from speech to speech.
That matters because voice is less forgiving than chat. In a text app, a short delay feels normal, but in a live conversation, even a small pause can make the interaction feel awkward. LiveKit is built around low-latency realtime media, using WebRTC (a web technology designed for fast audio and video communication) so the agent can keep up with the flow of a real conversation. That design is what makes LiveKit Voice AI feel closer to a phone call than to a command box.
So what does this look like for you as a builder? It means you can start with a simple voice assistant and grow from there. LiveKit’s quickstart says you can get a voice assistant running in less than 10 minutes, and you can speak to it in a terminal, browser, telephone, or native app. If you’re asking, “Can I build a voice AI agent that works across different channels?” the answer is yes, and LiveKit is designed with that path in mind.
The platform also gives you room to choose how your agent thinks and speaks. You can build with specialized model providers through LiveKit Inference, which offers access to providers such as OpenAI, Google, Deepgram, Cartesia, ElevenLabs, and others, or you can use a single realtime model for a more direct speech-to-speech experience. That flexibility is important because different projects need different tradeoffs: one app may want maximum control, while another may want the smoothest possible voice.
There’s also a gentler on-ramp for beginners. LiveKit offers Agent Builder, a browser-based way to prototype a voice agent without writing code, which is useful when you want to test an idea before you commit to a full build. From there, you can move into the LiveKit Agents SDK, add telephony through SIP (Session Initiation Protocol, the standard used for phone-call style communication), and eventually deploy the agent to production. In other words, LiveKit Voice AI is not just a demo tool; it is a path from first experiment to working product.
That’s the heart of it: LiveKit Voice AI gives us the conversation plumbing, the model integrations, and the realtime transport needed to build agents that can listen and respond like something alive. Once you see it that way, the rest of the journey becomes much easier, because we’re no longer trying to assemble disconnected parts—we’re working inside a system that was built for voice from the start.
Install Tools and Dependencies
What do you need installed before you can build a LiveKit voice agent? At this point, we are not hunting for one magic download; we are laying out the tools that let the rest of the system breathe. LiveKit’s quickstart says the Python path needs Python 3.10 or newer and uses uv, while the Node.js path needs Node.js 20 or newer and uses pnpm 10.15.0 or newer. The same guide also assumes you have the latest LiveKit CLI, because that is the tool you use to create, configure, and eventually deploy the agent.
The easiest way to picture this is as preparing a small workshop before the real building starts. uv or pnpm is the workbench, the LiveKit CLI is the keyring that opens your project, and the project itself is where the agent will live. On the Python side, LiveKit’s quickstart begins with uv init livekit-voice-agent --bare, then moves into the directory you just created. On the Node.js side, it starts with a new module project, then adds TypeScript and tsx so you can run modern TypeScript files without a lot of extra ceremony. That keeps the first setup clean, which matters a lot when you are still learning what each moving part does.
Then come the dependencies, and this is the moment when the shape of the LiveKit voice agent starts to appear. For the classic speech pipeline, the quickstart installs livekit-agents[silero,turn-detector]~=1.4, livekit-plugins-noise-cancellation~=0.2, and python-dotenv; for the realtime model path, it uses livekit-agents[openai]~=1.4 with the same noise-cancellation package and python-dotenv. In plain language, you are pulling in the core LiveKit Agents runtime plus the extras the quickstart expects for speech handling, cleaner audio, and local environment settings. If you ever wondered, “What do I need installed for a LiveKit voice agent?”, this is the bundle the docs are pointing you toward.
After the packages are in place, you give the agent the details it cannot guess on its own. LiveKit’s setup writes your LIVEKIT_API_KEY, LIVEKIT_API_SECRET, and LIVEKIT_URL into a .env.local file with lk app env -w, and the realtime path also requires OPENAI_API_KEY. If you are using the plugin-based path, the docs say you must download the model files before running the agent, which the Python quickstart does with uv run agent.py download-files. This can feel like a lot of housekeeping, but it is really the point where your LiveKit voice agent stops being a folder of code and starts becoming something that can actually listen and respond.
Once those pieces are settled, the rest becomes much less mysterious. The quickstart supports console mode for local terminal testing, dev mode for development, and start mode for production, so the same project can grow with you instead of forcing you to rebuild later. That is the real reason we spend time on tools and dependencies first: a missing package or an outdated CLI can make a perfectly good LiveKit voice agent feel broken before it ever gets a chance to speak. With the workshop ready, we can move into the code with far less friction.
Configure LiveKit Cloud Access
Now that the workshop is ready, we need to open the door to LiveKit Cloud and make sure our agent knows which project it belongs to. LiveKit Cloud access is the bridge between your local code and the cloud project that will host your voice agent, and LiveKit’s docs describe the CLI as the main tool for managing that connection. In practice, that means creating a LiveKit Cloud project, linking it to the CLI, and letting the project’s credentials flow into your app so the agent can join rooms, move audio, and deploy cleanly.
The first step is the one that feels most like getting a passport stamped: sign in to a free LiveKit Cloud account, create a project, and then run lk cloud auth. The CLI opens a browser window so you can authenticate and link the project to your machine, which keeps the cloud side and the local side in sync. If you have ever wondered, “How do I connect my LiveKit voice agent to LiveKit Cloud?”, this is the moment where that connection becomes real.
Once the project is linked, the next piece is the credentials file that your code will read at startup. The quickstart’s CLI path creates an .env.local file for you, and the guide uses python-dotenv so the agent can load those values without you hard-coding them into the source. LiveKit Cloud automatically provides LIVEKIT_URL, LIVEKIT_API_KEY, and LIVEKIT_API_SECRET, and those values are not meant to be set or edited manually as secrets. That is why the cloud access setup feels a little like labeling keys in a drawer: the agent needs the right key, the right lock, and the right address before it can step into the room.
There is one more detail that can surprise beginners, and it matters if you are using the realtime model path. The quickstart shows that the LiveKit Inference pipeline can run the classic speech-to-text, large language model, and text-to-speech stack without any additional setup, but the realtime model path requires OPENAI_API_KEY. In plain language, your LiveKit Cloud access may be enough for the LiveKit side of the conversation, but the model provider you choose can still bring its own credential into the picture. That is not a sign that anything is broken; it is just the difference between using a managed pipeline and plugging in an external model service.
As the project grows, the same cloud connection keeps paying off because LiveKit’s agent commands can create, deploy, inspect, and update your agent from the CLI. The deployment commands accept secrets through --secrets, --secrets-file, or --secret-mount, and those values are injected into the agent as environment variables at runtime. LiveKit also says secret values are encrypted in storage and cannot be retrieved from the CLI or dashboard, which is exactly the kind of safety net you want once your agent starts depending on real credentials.
So the shape of LiveKit Cloud access is this: authenticate the CLI, let it bind your project, keep your local credentials in .env.local, and add any model-specific keys only when your agent actually needs them. That gives you a clean path from a local prototype to a cloud-ready voice agent without changing the whole architecture halfway through. And once this part is in place, we can move forward with much less friction, because the agent is no longer just code on disk, it is code that knows where it belongs in LiveKit Cloud.
Build the Agent Code
Now the LiveKit voice agent starts to feel tangible, because this is where the code turns a pile of setup steps into something that can actually listen, think, and answer. If you’re wondering, “What does the agent code actually do?”, the short answer is that it wires together your models, your room connection, and your assistant’s personality. LiveKit’s quickstart gives full starter files for both the classic STT-LLM-TTS path and the realtime model path, so you can copy them, adapt them, and grow from there.
The first thing we meet in the file is the loading of .env.local, and that matters because it keeps credentials out of the source code. load_dotenv() reads environment variables from that file, so the agent can find its LiveKit settings without you hard-coding secrets into the script. Right after that comes the Assistant class, which is the simplest way to think about your agent’s voice and behavior: it is the place where you define the instructions that shape how the assistant speaks. In the quickstart, those instructions tell the assistant to be helpful, friendly, concise, and light on flashy punctuation, which gives the voice agent a consistent personality from the start.
Once that personality exists, the file creates an AgentServer and attaches a handler with @server.rtc_session(agent_name="my-agent"). That decorator tells LiveKit to run your code whenever a realtime communication session starts, and the ctx.room object represents the room your agent joins. Think of this part like the front desk of a small studio: the server receives the session, the handler opens the door, and the room is where the conversation actually happens. That is the core of LiveKit voice agent code, and it is why the file feels less like a script and more like a small event-driven system.
From there, the AgentSession becomes the assembly line that turns speech into speech. In the STT-LLM-TTS version, STT means speech-to-text, which converts your words into text; LLM means large language model, which reasons over that text; and TTS means text-to-speech, which speaks the reply aloud. The quickstart wires those pieces together with Deepgram, OpenAI, and Cartesia models, then adds silero.VAD.load(), where VAD means voice activity detection, the part that notices when someone is actually speaking. It also adds turn detection and noise cancellation, which help the agent decide when your sentence has ended and keep the audio cleaner on the way in.
Then the session starts, and that is the moment the agent becomes conversational instead of theoretical. session.start() joins the room, attaches the Assistant, and applies the room options that handle audio input, while session.generate_reply() gives the conversation its first nudge by asking the assistant to greet the user. LiveKit’s realtime model path is even leaner: instead of stitching together STT, LLM, and TTS separately, it uses openai.realtime.RealtimeModel(voice="coral"), and the docs note that this path requires OPENAI_API_KEY. So if you’re building a LiveKit voice agent and want the smoothest first version, the code is basically choosing between a modular pipeline and a single realtime model.
The best way to approach this code is to change one thing at a time and watch how the agent changes with it. If you edit the instructions, you change the personality; if you swap models, you change the sound and reasoning style; if you adjust turn handling or noise cancellation, you change the conversation feel. That is the real lesson of LiveKit voice agent code: it is not a giant mystery box, but a set of small, readable parts that you can reshape as you learn. Once this skeleton runs, we can start tuning the experience instead of wrestling the framework itself.
Add Speech and TTS Models
Now we reach the part where a LiveKit voice agent begins to sound real, because we are giving it the pieces that listen and the pieces that speak. If you have been wondering, “How do I add speech and TTS models to a LiveKit voice agent?”, this is the moment where the answer becomes concrete. Speech-to-text, or STT, turns spoken words into text, and text-to-speech, or TTS, turns text back into spoken audio. Together, they form the bridge between a human voice and the assistant’s reply.
The easiest way to think about these models is like a small translation team. The speech model stands at the door and writes down what the user said, while the TTS model takes the assistant’s response and gives it a voice. In a LiveKit voice agent, that means we are not teaching the agent to talk in one giant leap; we are connecting two careful steps that work together. That separation matters because it gives us room to improve each side independently, which is often the difference between a rough demo and a conversation that feels smooth.
In the classic pipeline, we plug the STT model into the session so the agent can hear clearly, then we plug in the TTS model so it can answer aloud. The code in the quickstart shows this with provider-based models, and that is a helpful pattern for beginners because each part has a clear job. When we choose a speech model such as Deepgram for recognition and a voice model such as Cartesia or ElevenLabs for audio output, we are making two separate decisions: how well the agent understands speech, and how naturally it sounds when it speaks. Those choices shape the personality of the whole LiveKit voice agent.
The important thing is that model selection is not only about quality; it is also about feel. A fast STT model can make the conversation respond more like a live phone call, while a richer TTS model can make the assistant sound warmer and less robotic. That balance is why LiveKit supports both a modular speech stack and a realtime model path. The modular path gives you control over the speech-to-text and text-to-speech layers, while the realtime path reduces the number of moving parts by handling the conversation more directly.
You can also think of this as tuning the rhythm of the interaction. If the user pauses halfway through a sentence, the speech model and turn detection logic help decide whether the assistant should wait or start preparing a reply. If the reply sounds clipped or unnatural, the TTS model may need a different voice or another provider. These are not failures; they are the normal adjustments we make when building a LiveKit voice agent that has to work in the real world instead of a perfect demo room.
This is also where the code starts to feel friendly instead of intimidating. You are not rewriting the whole app when you swap a speech model or change a TTS voice; you are changing one part of the pipeline and listening to the result. That makes experimentation safe, and it gives you a clear way to answer a practical question: which combination of speech model and TTS model sounds best for this specific agent? The only reliable way to find out is to test, speak, listen, and compare.
Once those models are in place, the rest of the system has something stable to stand on. The assistant can hear the user through STT, think through the language model, and speak back through TTS without the architecture feeling tangled. That is the payoff of this step: the LiveKit voice agent stops being a set of disconnected tools and starts behaving like a conversation, which gives us a much better foundation for the tuning work ahead.
Test and Deploy Your Agent
The moment before a voice agent goes live can feel a lot like hearing your own voice played back for the first time. You have the assistant built, the models wired in, and the room connection ready, but now we need to find out how the LiveKit voice agent behaves when real speech, real pauses, and real mistakes enter the picture. If you’re asking, “How do I test a LiveKit voice agent before I deploy it?”, this is where we turn curiosity into proof.
The safest place to start is the local loop, because it gives you a quiet room to listen for problems. LiveKit’s quickstart supports console mode for terminal testing, which makes it easy to check whether the agent hears you, answers in the right voice, and follows the instructions you gave it. In this stage, we are not chasing perfection; we are watching for the basics, like whether the assistant joins at all, whether it replies too early, and whether the voice sounds clear enough to carry a conversation.
From there, we move into dev mode, which feels a little closer to a rehearsal with the stage lights on. This is where the LiveKit voice agent starts behaving more like a real app, so it is the right place to test turn-taking, audio quality, and the way the agent handles short interruptions or unfinished sentences. A good habit here is to speak the same prompt in a few different ways, because voice agents often fail in the edges, not in the happy path. That is also where you learn whether your instructions are doing the job you expected or whether the agent needs a gentler nudge.
Testing is also where secrets and environment variables earn their keep. Before you deploy your agent, make sure the values in .env.local are present, correct, and limited to what the agent truly needs, because missing credentials usually show up as silent failures at the worst possible time. If your setup uses a provider-specific key for the model layer, test that path too, since a LiveKit voice agent can be healthy on the LiveKit side and still fail when a model provider cannot answer. The goal is not to memorize every setting; the goal is to catch the mismatch before users do.
Once the local tests feel steady, deployment becomes less like a leap and more like a controlled handoff. LiveKit’s production path is designed to reuse the same agent code, so the move from development to deployment should not require a rewrite. That is the practical advantage of building with the LiveKit Agents stack: you can test and deploy your agent without changing the core shape of the project, which keeps the work familiar even as the audience grows.
The deployment step is also where you want to be careful with secrets. LiveKit supports passing sensitive values at runtime, which means you do not need to bake credentials into the code or expose them in the project files. That matters because a LiveKit voice agent often depends on more than one service, and production is the wrong place to improvise with keys, URLs, or model settings. If you have ever wondered why deployment feels fussy, the answer is simple: production is where small mistakes become visible to everyone.
After the agent is live, we do not stop listening. We watch how long responses take, whether the conversation flows naturally, and whether the agent handles unexpected speech without getting lost. A voice agent deployment is healthiest when testing stays part of the routine, because real users will always find the edge cases we did not think to try. That is the quiet secret of shipping a LiveKit voice agent: launch is not the finish line, it is the first honest conversation with the world.