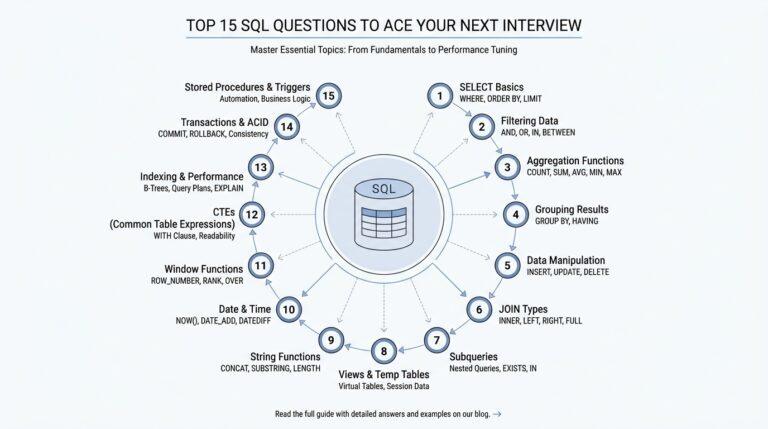
Understand Join Basics
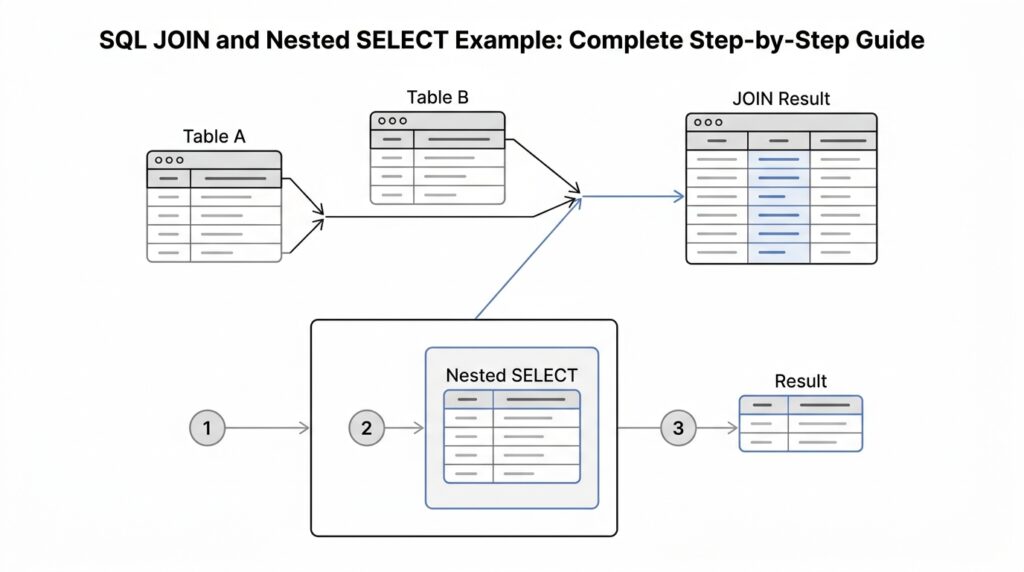
What does SQL JOIN actually do when you need information from more than one table? Picture a customers table and an orders table, each one a structured list of rows. SQL JOIN is the bridge that lets those rows meet when they share a related column, such as customer_id, so the database can build one result table from two separate sources instead of making you stitch the data together by hand. That is the heart of join basics, and once you see it, the rest starts to feel less like syntax and more like matching puzzle pieces.
The next piece of the story is the join condition, usually written with ON. That condition is the rule that says which rows belong together, much like telling two puzzle pieces to connect only when their shapes line up. If we write customers.customer_id = orders.customer_id, only rows with the same customer id are paired; if we leave out that relationship, the database can fall back to a Cartesian product, which means every row from one side is combined with every row from the other. That is why the condition matters so much: it turns a huge, noisy pairing into a meaningful relationship.
The most familiar flavor is INNER JOIN, and this is often the first join beginners meet. An inner join keeps only the rows that match on both sides, so if one customer has three orders, that customer can appear three times because each order creates its own matching pair. That repetition is not a bug; it is the database showing you every relationship that satisfies the join rule. When people ask, “What is the difference between SQL JOIN and INNER JOIN?”, this is the answer hiding in plain sight: join basics become much clearer once you realize that inner join is the match-only version of the idea.
Now we reach the part that often trips people up: LEFT JOIN and RIGHT JOIN. A LEFT JOIN keeps every row from the left table and fills in missing columns from the right table with NULL, which is a marker meaning no value is available in that spot; a RIGHT JOIN does the same thing in the opposite direction. So the order of the tables matters for outer joins, because it decides which side gets protected even when the other side has gaps. That is a useful mental picture to hold onto, especially when one table has records that do not always find a partner in the other.
There is one more basic shape worth knowing: CROSS JOIN. This join creates every possible pairing between two tables, which means a 10-row table crossed with another 10-row table produces 100 combinations. That can be helpful in special cases, but it is usually too broad for everyday reporting, so we use it with care. Learning it, though, helps the rest of SQL JOIN click into place, because every join is really a promise about which rows survive, which rows repeat, and which rows disappear. With that mental model in place, we can move forward feeling much more confident when joins and nested SELECT statements start working side by side.
Prepare Example Tables
When we start building SQL JOIN and nested SELECT examples, the best first move is to pick tables that feel small, clear, and a little bit imperfect. What tables should we use when we want the results to make sense at a glance? We usually choose a pair like customers and orders, because they behave like two halves of a real story: one table tells us who someone is, and the other tells us what they bought.
To keep the lesson easy to follow, we want each table to have one column that acts like a name tag. That tag is called a primary key, which means a column with a unique value for each row. In the orders table, we also use a foreign key, which is a column that points to the primary key in another table. This connection is the thread that SQL JOIN will grab later, and it also gives a nested SELECT a meaningful path to follow.
CREATE TABLE customers (
  customer_id INT PRIMARY KEY,
  customer_name VARCHAR(50),
  city VARCHAR(50)
);

CREATE TABLE orders (
  order_id INT PRIMARY KEY,
  customer_id INT,
  order_date DATE,
  amount DECIMAL(10, 2)
);
Now let’s give the customers table a small cast of characters. We want enough variety to show matches, repeats, and missing rows, because that is where SQL JOIN becomes interesting. Notice that one customer will not have any orders yet; that gap will help us later when we compare join types and follow a nested SELECT step by step.
| customer_id | customer_name | city |
|---|---|---|
| 1 | Ava Chen | Seattle |
| 2 | Marco Diaz | Austin |
| 3 | Priya Singh | Denver |
| 4 | Leo Brooks | Miami |
The orders table should feel a little messier, because real transaction data often repeats the same customer more than once. That repetition is not a problem; it is the whole point. When one customer places two orders, SQL JOIN can pair that customer row with both order rows, and a nested SELECT can later filter or summarize those purchases before the join happens.
| order_id | customer_id | order_date | amount |
|---|---|---|---|
| 101 | 1 | 2026-01-05 | 45.00 |
| 102 | 1 | 2026-01-12 | 18.50 |
| 103 | 2 | 2026-01-08 | 72.00 |
| 104 | 3 | 2026-01-15 | 29.99 |
These example tables are intentionally uneven, and that unevenness teaches us something useful. Ava has two orders, Marco and Priya each have one, and Leo has none, so we already have the kind of pattern that reveals how matching works and where missing values will appear later as NULL, which means “no value here.” If you have ever wondered, “How do I set up SQL JOIN example tables so the result is easy to understand?”, this is the shape to use.
Another small detail matters more than it first appears: we link the tables with IDs instead of names. Names can change, be misspelled, or appear more than once, but an ID stays stable and precise. That makes the example tables feel like a reliable bridge between rows, which is exactly what we want before we start asking which rows should match, which should stay separate, and which should be filtered inside a nested SELECT.
With these tables in place, the rest of the walkthrough can move naturally from data setup to data discovery. We already have one-to-many relationships, repeated customer IDs, and one unmatched customer, so the examples ahead will have something real to reveal instead of looking like abstract diagrams. Once we start querying, these rows will give us a clear stage for watching SQL JOIN and nested SELECT do their work.
Write Inner Join Query
Now that our two tables are on the stage, the inner join query is where the story starts to move. We already know the customers table and the orders table share a common thread through customer_id, so the next step is to ask the database to line up only the rows that truly belong together. If you have been wondering, “How do I write an inner join query that shows each customer with their orders?”, this is the moment where that question turns into a real result.
We begin with the basic shape of the query, and the shape matters because it tells the database how to think. In SQL, SELECT names the columns we want, FROM points to the starting table, and INNER JOIN says we only want matching rows from both sides. The ON clause is the handshake between the tables; it defines the exact columns that must match before any row is allowed into the result.
SELECT
  customers.customer_id,
  customers.customer_name,
  orders.order_id,
  orders.order_date,
  orders.amount
FROM customers
INNER JOIN orders
  ON customers.customer_id = orders.customer_id;
This query is a clean example of an inner join query because it keeps the relationship visible and easy to follow. We ask for the customer details and the order details in the same row, and the database does the pairing for us. Notice that Leo Brooks does not appear here, because he has no matching order, and an INNER JOIN only keeps rows that find a partner on both sides.
A small but important detail is the use of table names in front of each column. That extra piece, called a table alias when shortened or a fully qualified column reference when written out, helps the database know exactly where each field comes from. It also protects us from confusion when two tables share the same column name, like customer_id, which appears in both tables and acts like the bridge between them.
If we walk through the output row by row, the pattern becomes much easier to see. Ava Chen appears twice because she has two orders, Marco Diaz appears once, and Priya Singh appears once. That repeated customer row is not a mistake; it is the natural result of a one-to-many relationship, where one customer can connect to many orders, and an INNER JOIN preserves each valid match.
Here is what the result feels like in plain language: the database looks at one row from customers, then searches for a row in orders with the same customer_id. When it finds one, it places them side by side in the result set. When it finds more than one, it repeats the customer row so each matching order can show up on its own line. When it finds none, it leaves that customer out entirely, which is the defining behavior of an INNER JOIN.
That is why an inner join query often feels like sorting mail into matched envelopes. We do not throw anything into a giant pile; we only keep the pieces that clearly belong together. This makes the output excellent for reports, order histories, and any situation where you want to see confirmed relationships rather than a mix of matched and unmatched data.
As we keep going, this query gives us a strong base for more detailed filtering and nested SELECT examples, because now we know exactly how the joined rows are formed. Once you can read this output with confidence, it becomes much easier to ask deeper questions, such as which customers placed the largest orders or which purchases happened during a specific date range. The join has done its job, and now the data is ready for the next layer of the journey.
Add Nested Select Filter
At this point, the join is already telling a clear story, but we may want to narrow the cast before we bring the tables together. A nested SELECT — also called a subquery, which means a query inside another query — lets us do exactly that. Instead of joining every order, we can first ask, “Which rows are worth keeping?” and then hand only those rows to the join. That is how SQL JOIN and nested SELECT work together: one gathers relationships, the other trims the data to the part we care about most.
Imagine we only want orders above a certain amount, because smaller purchases would distract from the lesson. A nested SELECT filter acts like a screening desk before the main event, checking each order and letting only the qualifying rows through. In our example, we might keep orders of $30 or more, which would include Ava’s larger purchase, Marco’s order, and Priya’s order, while leaving out Ava’s smaller one. That gives us a cleaner result and helps us focus on the rows that matter for the question we are asking.
Here is what that looks like in SQL:
SELECT
  c.customer_id,
  c.customer_name,
  filtered_orders.order_id,
  filtered_orders.order_date,
  filtered_orders.amount
FROM customers c
INNER JOIN (
  SELECT
    order_id,
    customer_id,
    order_date,
    amount
  FROM orders
  WHERE amount >= 30
) filtered_orders
  ON c.customer_id = filtered_orders.customer_id;
This pattern may look unfamiliar at first, but the logic is steady. The inner query builds a smaller table-like result by pulling only the orders that meet the WHERE condition, and the outer query joins that filtered set to customers. The word filtered_orders is an alias, which is a short temporary name we give to a table or subquery so we can refer to it more easily. When people ask, “How do I add a nested SELECT filter in SQL JOIN?”, this is the shape they usually mean.
The real advantage appears when we read the result like a story instead of a spreadsheet. We are no longer asking the database to match every order and then sort out the noise afterward; we are asking it to remove the noise first. That means fewer rows to compare, a more focused result set, and a query that can be easier to reason about when the condition gets more specific, such as filtering by date range, status, or amount. In other words, the nested SELECT acts like a gatekeeper before the join does its matching work.
It also helps to notice what changes in the output. Ava Chen still appears, but now only for the order that meets the filter, and Leo Brooks still does not appear because he had no matching orders to begin with. The nested SELECT does not change the meaning of the inner join; it changes the pool of rows the join gets to work with. That distinction is small on the page, but it is a big step in how we think about SQL JOIN and nested SELECT as a pair.
If we want to make the filter feel even more concrete, we can swap the amount rule for a date rule and ask for only orders placed after January 10, 2026. The structure stays the same, but the question changes, which is a useful habit to build. Once you see that the nested SELECT is really just a pre-join filter, you can start using it to answer more precise questions without rewriting the whole query from scratch.
Compare Query Results
Now that we have both query shapes on the table, the most useful thing we can do is compare query results and see how each one changes the story the data tells. An INNER JOIN shows every matched order, while a nested SELECT narrows the order list before the match even begins. If you have been wondering, “Why do two SQL JOIN queries look so similar but return different rows?”, this is where the answer becomes visible in the result set.
The plain inner join gives us the broadest view of the relationship between customers and orders. In our example, Ava Chen appears twice because she has two orders, Marco Diaz appears once, and Priya Singh appears once, which means the result set includes every valid match. That output is useful when you want the full picture of activity, because it shows the natural one-to-many relationship without filtering anything away. When we compare query results at this stage, we are really asking how much of the original data each query chooses to preserve.
The nested SELECT version tells a more selective story. Because the inner query filters orders by amount first, the outer join only receives the rows that satisfy that rule, which means the final result set is smaller and more focused. In our example, Ava’s lower-value order disappears before the join happens, so the joined output changes even though the customer table stays the same. That difference is the heart of SQL JOIN and nested SELECT working together: one query shape shows all matches, and the other shows only the matches that survive an earlier test.
This comparison matters because the row count is often the first clue that a query is behaving differently. If the inner join returns four rows and the filtered version returns three, the database is not being mysterious; it is following the rules we gave it. The inner join answers, “Which rows match?” while the nested SELECT version answers, “Which rows match after we remove the ones we do not want?” That small shift changes how we read the data, especially when we are looking for large orders, recent orders, or any other specific slice of activity.
It also helps to compare the two results column by column. The customer fields stay the same in both queries, but the order fields may shrink, repeat less often, or disappear entirely depending on the filter. Leo Brooks still does not appear in either output, because an inner join only keeps customers with matching orders, and the filtered query still depends on that same matching rule. So while the nested SELECT changes which orders survive, it does not change the join type itself; it only changes the pool of rows available to join.
A good habit here is to read the result like a timeline of decisions. First, the nested SELECT decides which orders are allowed into the filtered set, and then the join decides which customers can pair with those orders. That two-step process is especially helpful when your SQL JOIN query starts producing more rows than you expected or when you want to verify that a subquery is excluding the right records. In practice, comparing query results this way helps you spot whether a problem lives in the filter, the join condition, or the data itself.
So when you look at two outputs side by side, do not think of one as “right” and the other as “wrong.” Think of them as two different answers to two different questions, each shaped by the same tables but guided by a different path through the data. Once you get comfortable comparing SQL JOIN results with nested SELECT results, you gain a much sharper sense of how the database is thinking, which makes the next step—testing more precise filters and combinations—feel a lot less like guesswork.
Verify Final Output
Once the query runs, the real work begins: we need to verify the final output and make sure the rows tell the story we meant to ask for. This is the moment where SQL JOIN and nested SELECT stop being code on the screen and become a result set we can trust, row by row. If you have ever looked at a table and wondered, “How do I know this SQL JOIN output is correct?”, this is the checkpoint that answers that question.
The first thing we do is compare the output to the original question, not to our guess. In our example, the inner join should show only customers who have matching orders, and the nested SELECT should narrow those orders before the join happens. That means the final output should include only the rows that survive both rules, with no surprise customers and no missing matches that should have been there. When the result matches the question, we know the query is doing its job.
A second check is the row count, because counting often reveals mistakes before anything else does. If one customer has two qualifying orders, we expect two rows for that customer in an inner join; if a nested SELECT filters one of those orders out, the count should drop accordingly. That change is not a problem—it is evidence that the filter worked. When the number of rows looks off, we can trace the path backward and ask whether the issue came from the join condition, the filter, or the source data itself.
Next, we look at the values in each column and ask whether they line up the way a real relationship should. The customer_id in the customer row should match the customer_id in the order row, and the order details should belong to that same person. If we see duplicate-looking rows, we should pause before assuming something is broken, because one-to-many relationships naturally repeat the customer information for each matching order. That repetition is a sign of a healthy SQL JOIN, not a sign of trouble.
This is also where NULL, which means “no value here,” becomes important to notice. In an inner join, unmatched customers do not appear at all, so we should not expect NULL values for missing order data in that result. If we later switch to a LEFT JOIN, those missing fields would show up as NULL, and that would tell us the customer had no matching order. Reading those gaps correctly is part of verifying the final output, because the absence of a row can be just as meaningful as the presence of one.
A helpful habit is to test the output with a small mental checklist as we read it. Do the rows match the filter we added? Do the repeated customers make sense? Did the nested SELECT remove only the records we wanted removed? These questions keep us grounded, especially when the query grows longer and the result set feels harder to read. Verification is less about memorizing syntax and more about confirming that the data behaved the way the business question asked it to behave.
The cleanest final check is to look for one row that proves the logic and one row that proves the limit. For example, a qualifying customer with an eligible order should appear exactly where we expect, while a customer with no matching order should stay out of the inner join result. That contrast tells us the query is both inclusive and selective in the right places. Once we can read the output this way, we are not just running SQL JOIN and nested SELECT queries—we are checking whether the answer is faithful, row by row, to the question we started with.