Set Up Flutter Project
When we set up a Flutter project for a real-time voice AI voice assistant with Pipecat, we are really building the app’s front door. The agent may live on a backend, but the Flutter app still has to collect the user’s voice, send data over the network, and play responses back quickly enough to feel conversational. Flutter starts us with a working app shell through flutter create, and that command also generates the pubspec.yaml file that will guide packages, assets, and SDK constraints as the project grows. Pipecat’s docs describe its ecosystem as the place where voice and multimodal agents connect to mobile and other clients, which is why this setup step matters so much.
The first practical move is to create the app and run it once. flutter create gives you a standard project structure, including the app scaffold and the pubspec at the root, and Flutter’s docs note that the first build also produces a pubspec.lock file so package versions stay consistent between builds. That small detail saves us from the frustrating “it works on my machine” problem later, especially when we are tuning audio and streaming behavior across devices. If you are wondering, “How do I set up a Flutter project for a voice assistant without getting lost?” this is the calm starting point: build the scaffold first, then add the voice pieces one by one.
Next, we add the dependencies that will carry the conversation. Flutter recommends adding packages with flutter pub add, and when you change pubspec.yaml, running flutter pub get refreshes the project so the new dependencies are ready to use. Think of pubspec.yaml as the project’s guest list: it tells Flutter which tools are allowed into the room. For a Pipecat-based assistant, this is where you prepare the app to talk to your backend and, if needed, to handle audio, state, or streaming connections in later sections.
Because voice is the whole point here, permissions are not optional background noise; they are part of the story. On Android, apps that need the internet must declare android.permission.INTERNET, and apps that record from the microphone must declare android.permission.RECORD_AUDIO and ask for it at runtime because it is a dangerous permission. On iOS, Apple requires NSMicrophoneUsageDescription in Info.plist, with a purpose string that explains why the app wants microphone access. In a Flutter project for a voice assistant, these permission messages are the moment where we tell the operating system, and the user, exactly what the app intends to do.
It also helps to remember that voice traffic should travel on secure roads. Flutter’s networking docs point out that Android apps need the internet permission for network access, and Flutter’s security guidance says insecure HTTP connections are disabled by default on iOS and Android, so HTTPS is the safer expectation for your Pipecat backend. This is one of those setup decisions that feels invisible now but pays off later, because a real-time voice AI app spends a lot of time opening connections, streaming audio, and waiting for responses.
Before we move on, give the project one honest test on real hardware. Android’s audio-capture docs note that the emulator cannot record audio, so a physical device is the better place to check microphone access and live voice flow. Once the project opens, the packages resolve, and the permissions are in place, your Flutter project is no longer a blank template; it is a ready workspace for the UI, the audio path, and the Pipecat connection that we will wire up next.
Build the Pipecat Backend
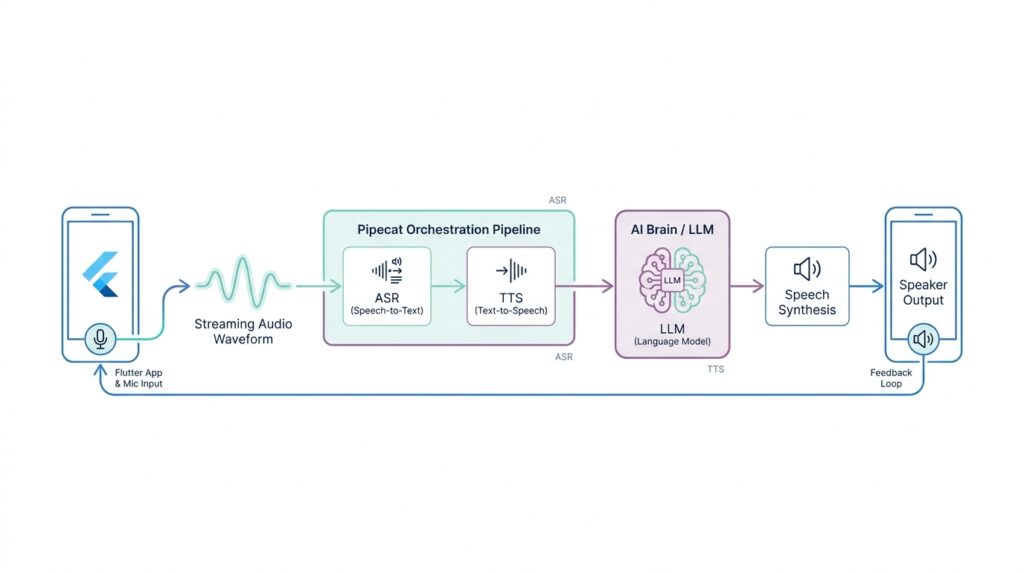
Now that the Flutter app can collect voice and show the conversation, the Pipecat backend becomes the room where the real work happens. Pipecat is an open-source Python framework for voice and multimodal AI agents, and it orchestrates transports, processors, and AI services so a conversation can move with low latency. If you have been wondering, “What does a Pipecat backend actually do?” the answer is that it listens, thinks, speaks, and keeps the turn-taking organized while your app stays focused on the screen.
The easiest way to picture the backend is as a train line with several stations. Audio enters through a transport, which is the communication layer between the user and the bot, then a pipeline passes that data through processors before sending the response back out again. Pipecat’s docs show the common flow as transport.input(), speech-to-text, context handling, the language model, text-to-speech, and transport.output(), and that order matters because each step prepares the next one. In other words, the Pipecat backend is not one giant block of logic; it is a carefully arranged path that turns sound into meaning and meaning back into sound.
Once we have that picture, the next question is which road the data should travel on. Pipecat supports both WebSocket and WebRTC-based transports, and its client SDKs are built for web and mobile apps, handling transport management, media, and session lifecycle. The docs recommend WebRTC for production client-server applications because it handles varying network conditions and media quality better than raw WebSocket, while WebSocket is a lighter choice for prototypes and controlled environments. So if we are building a Flutter voice assistant backend, we can think of WebSocket as the first test lane and WebRTC as the sturdier highway for later.
A good voice assistant backend also has to remember what was said a few moments ago, because without memory the conversation feels like starting over every time. Pipecat handles that with LLMContext and context aggregators, which preserve multi-turn dialogue and help adapt messages across providers when their roles differ. On top of that, Pipecat’s RTVI layer uses an RTVIProcessor in the pipeline and an RTVIObserver to translate pipeline events into client-compatible messages, which keeps the app synced with things like transcriptions, turn changes, and connection events. That is the quiet part of the Pipecat backend that makes greetings, interruptions, and handoffs feel natural instead of clumsy.
From here, the setup becomes a series of small, steady moves. The quickstart shows Pipecat running from a Python bot entry point, loading API keys from environment variables, and wiring together speech recognition, a language model, and speech synthesis as separate services that can be swapped out as needed. Pipecat’s supported-services guide also shows that these capabilities are added through optional extras, which is a helpful reminder that we are assembling a backend from parts rather than locking ourselves into one provider forever. That flexibility is the real payoff: once the Pipecat backend is standing, we can tune the transport, swap models, and shape the conversation without rewriting the whole assistant.
Connect Flutter with RTVI
Now the Flutter app finally meets the backend, and this is where the voice assistant starts to feel alive. In RTVI, your app is not sending random audio blobs and hoping for the best; it is speaking a shared protocol that Pipecat understands. RTVI is Pipecat’s real-time voice and video inference standard, and it gives the client and server a common language for connection setup, transcriptions, bot responses, and session state. If you have been wondering, “How do I connect a Flutter app to an RTVI backend without everything becoming fragile?” the answer is to treat the app as the client side of that shared conversation.
The first thing we want to get right is the shape of the connection. Pipecat’s client SDKs are built around a transport layer, which is the path the conversation travels over, and that transport can be WebSocket or WebRTC. Pipecat’s docs say the client SDKs manage transport, media devices, session lifecycle, and messaging, and they recommend WebRTC for web and mobile clients because it handles changing network conditions and media quality better than raw WebSocket. In a Flutter voice assistant, that means we are not wiring the UI directly to the model; we are opening a transport first, then letting RTVI carry the rest.
Once the transport is open, the handshake tells both sides that the room is ready. The RTVI standard says the client sends a client-ready message after the transport media channels connect, and the server answers with bot-ready and initial configuration. Pipecat’s server docs explain that RTVIProcessor manages the bidirectional client communication, while RTVIObserver turns internal pipeline events into client-compatible messages. That division is useful to remember: your Flutter app handles the front of the stage, and Pipecat handles the voice pipeline behind the curtain.
From the Flutter side, this is where the app begins to feel less like a form and more like a live call. The RTVI message format uses an id, a label set to rtvi-ai, a type, and a data payload, so every event has a predictable envelope. That matters because it lets the app send custom messages, receive responses, and correlate replies without guessing which packet belongs to which action. Pipecat’s client docs also describe session lifecycle states such as connecting, ready, and disconnected, which gives us a clean mental model for showing a spinner, enabling the mic, or letting the user speak.
The real magic shows up after the handshake, when the Flutter UI starts listening for the little signals that make the conversation feel human. Pipecat’s RTVI observer translates events like speaking start and stop, transcription updates, bot output, metrics, and server messages into client-facing messages. That means your app can light up a “listening” indicator when the user starts speaking, render live transcript text as it arrives, and switch to a “thinking” state while the bot is working. The point is not just to move audio around; it is to keep the UI and the backend emotionally in sync, one event at a time.
As we connect Flutter with RTVI, the safest way to think is in layers. The transport carries the bytes, RTVI carries the meaning, and Pipecat’s pipeline turns that meaning into speech, text, and timing that the user can trust. The Flutter app does not need to understand every processor in the backend; it only needs to open the connection, announce readiness, and listen carefully for the events that tell the story of the conversation. From there, the bridge is in place, and the next step is turning those messages into a responsive voice-first interface.
Capture Microphone Audio
Now that the transport and permission groundwork is already in place, we can turn to the part that makes a voice assistant feel real: capture microphone audio and keep it moving. In Flutter, the official recipe for audio input uses the record package, and it supports both recording and live streaming so the app can hand sound off as it arrives instead of waiting for a finished file. If you are asking, “How do you capture microphone audio in Flutter for a voice assistant?” the short answer is that you want a stream of live chunks, not a saved memo.
That starts with an AudioRecorder, which is the object that controls the recording session. Flutter’s cookbook shows the familiar rhythm: create the recorder, ask for permission with hasPermission(), and only then begin capturing audio. The record package also calls out the microphone permission text on iOS through NSMicrophoneUsageDescription, which is the line in Info.plist that explains to the user why the app wants mic access. In a real-time voice AI app, that permission prompt is not a side quest; it is the moment where the conversation becomes allowed to begin.
Once the mic opens, the next decision is how to shape the sound. Flutter’s example uses a RecordConfig, which is a settings bundle for the recorder, and it shows a speech-friendly setup: AudioEncoder.pcm16bits for raw 16-bit Pulse-Code Modulation, sampleRate: 24000 for 24,000 samples per second, numChannels: 1 for mono, plus autoGain, echoCancel, and noiseSuppress to help speech stay clear. Think of it like tuning a radio before a long drive: we are not making music production choices here, we are trying to make spoken words clean, compact, and easy for the backend to understand.
With the recorder configured, startStream() becomes the most important doorway in the room. The Flutter cookbook shows that this method returns a stream of audio data, and that stream is where the app can process or forward microphone audio chunk by chunk. A tiny example looks like this: final stream = await recorder.startStream(recordConfig); stream.listen((audioChunk) { /* send audioChunk onward */ }); What this demonstrates is the shift from “recording” to “live transport”: the user speaks, the app receives small pieces of sound, and those pieces can travel toward Pipecat while the sentence is still being formed.
That live stream matters because Pipecat is built around real-time media, not delayed batch uploads. Pipecat’s client docs describe client SDKs that handle real-time audio/video transport, session lifecycle, and microphone device management, and they treat media at two levels: local devices and the live tracks flowing between client and bot. In other words, once Flutter captures microphone audio, we are feeding the same conversational pipeline that Pipecat expects to keep the exchange responsive. The record package is one practical way to collect that input, and Pipecat is the place where that input becomes part of the voice turn-taking.
There is one more small habit that keeps the whole experience steady: close the loop cleanly. Flutter’s cookbook shows pause(), resume(), stop(), and dispose(), and the record package also exposes helpers like hasPermission(request: false) and cancel() so you can keep control of the session state. The package supports recording to a stream in addition to a file, and it documents platform-specific behavior across Android, iOS, web, Windows, macOS, and Linux, so the mic path can fit different devices without changing the story you tell the user. Once we can reliably capture microphone audio, the next step is to hand those chunks into the transport and let the conversation start flowing.
Stream Transcripts in Real Time
Once the microphone stream is flowing, the next question becomes wonderfully human: how do we turn sound into words fast enough that the conversation still feels alive? This is where real-time transcripts enter the picture. In a Flutter voice assistant built with Pipecat, the app does not wait for an entire recording to finish; it sends speech onward in small pieces and listens for text as the backend recognizes it. If you have been wondering, “How do you stream transcripts in real time in a Flutter voice assistant?” this is the moment where the answer starts to feel concrete.
The key idea is that transcription is not one single event, but a sequence of updates. A speech-to-text system, which means software that turns spoken audio into written text, usually produces interim transcripts first and final transcripts later. Interim transcripts are the rough drafts that may change as the model hears more of the sentence, while final transcripts are the confirmed version once the system decides the phrase is complete. That distinction matters because it lets us show progress immediately instead of leaving the user staring at a blank screen.
Pipecat and RTVI make this live transcription flow easier to manage because the backend can emit structured events as audio is processed. Instead of treating transcript text like a random string that appears out of nowhere, we treat it like part of the conversation state. The backend can say, in effect, “here is the current draft,” then later say, “this line is finished.” That event-driven approach is what keeps a real-time voice assistant from feeling delayed or muddy, and it gives Flutter a clean stream of updates to render.
On the Flutter side, the job is to listen carefully and update the interface without making the user feel every internal twitch of the system. A practical pattern is to subscribe to the transcript event stream, store the latest partial text, and then replace or append it when the final version arrives. You can picture it like writing in pencil until the sentence is complete, then tracing it in ink. That small UX choice makes live transcription easier to read and much less distracting, especially when the user speaks in short bursts or corrects themselves mid-sentence.
This is also where the voice assistant becomes more trustworthy. When the app shows real-time transcripts, the user can tell that the microphone is working, that the backend is listening, and that the system understood at least part of what was said. In practice, that means your UI might show a subtle “listening” state, render partial text in a lighter style, and promote final text into the main chat history once it settles. These details sound small, but they are the difference between an assistant that feels responsive and one that feels like a black box.
The implementation itself usually follows a simple rhythm: send audio chunks, receive transcript events, and update the screen in response. In Dart, the language Flutter uses, that often means listening to a stream and calling setState() or updating a state manager whenever a new transcript message arrives. A question worth asking here is, “How do I keep the text from jumping around?” The answer is to separate the unstable draft from the stable final line, so the user sees motion only where motion makes sense. That way, real-time transcripts stay readable even when the model revises its guess midstream.
There is one more quiet benefit to streaming transcripts this way: it makes interruption and turn-taking easier. If the user starts speaking while the assistant is still responding, the app already has a live text trail that can help decide when the human has taken the floor again. Pipecat’s event-based pipeline and RTVI messaging are well suited to that kind of coordination because they keep the client and backend synchronized through the same conversation timeline. Once those transcript events are in place, the Flutter UI can move from passive display to active conversation, which is exactly what a natural voice assistant should do.
Add Agent Controls and Handoffs
Now that the app can hear, speak, and show live transcripts, we get to add the part that makes it feel respectful instead of pushy: control. In a Flutter voice assistant, agent controls are the buttons and states that let you steer the conversation, while a handoff is the moment one agent passes the baton to another agent or to a human. That may sound small, but it changes the whole experience. Instead of trapping the user in a single, endless voice loop, we give them ways to pause, interrupt, mute, or redirect the flow when the conversation needs to change course.
The first layer of control is often the simplest one: let the user decide when the microphone is active. A mute switch, a push-to-talk button, or a stop listening control gives people a sense of ownership, which matters a lot in a real-time voice AI app. We can also add barge-in, which means the user can speak over the assistant and interrupt it before it finishes. That feature is especially helpful in a Flutter voice assistant because it turns the experience from a monologue into a conversation, and it prevents the bot from talking too long when the user already knows what they want.
Once we have those basic controls, we can think about session control, which is the app’s way of managing the conversation as a whole. A session is the live interaction window between the user and the backend, and controls like pause, resume, reset, or end session help the app respond to real-world moments like background noise, mistakes, or a sudden need to start over. When we wire these controls to the Pipecat backend, we are not just changing the UI; we are telling the conversation engine what state it should be in. That keeps the Flutter app and the backend aligned, so the user never feels like one side is ignoring the other.
Handoffs are the next step, and they are easier to understand if we picture a busy front desk. One agent answers the question, then passes the caller to a specialist who knows the next piece of the puzzle. In a voice assistant, that specialist might be a different AI agent with a narrower job, such as billing, scheduling, or troubleshooting, or it might be a human support rep when the system reaches its limit. The handoff usually carries context such as the latest transcript, a short summary, and the user’s current intent, so the next agent does not have to ask the same questions again. That is how we keep the experience smooth instead of making the user repeat themselves.
This is where agent controls and handoffs work best together. If the user taps a “transfer” button, the app can stop the current agent, preserve the conversation state, and open a new path without losing the thread. If the assistant detects that the request is outside its lane, it can trigger the same flow automatically. Pipecat and RTVI make this kind of coordination practical because the backend can send structured events that Flutter can listen to, and those events can tell the UI when a control changed, when a transfer is starting, or when a new agent has taken over. In other words, the assistant is not guessing what happened; it is reacting to clear signals.
A good way to design these controls is to keep them visible but calm. You do not want the screen to feel crowded, but you do want the user to know where to tap when the conversation needs direction. A clear mic button, an interrupt action, and a handoff status message can do a lot with very little visual noise. If you are asking, “How do you add agent controls and handoffs in a Flutter voice assistant without making it confusing?” the answer is to expose only the actions that match the current moment and to use the backend state to drive what the user sees. That way, the assistant feels less like a machine that talks at people and more like a guide that knows when to lead, when to listen, and when to pass the baton.