Choose Your Local Hardware Setup
When you start planning a local hardware setup for a voice-controlled assistant, it helps to imagine the machine as a small kitchen rather than a single appliance. One part hears you, another part thinks, another part speaks, and all of them need enough room to work without tripping over each other. What hardware do you need for a local AI assistant at home? The short answer is: enough computer power for speech and language tasks, enough memory to keep things moving, and good audio gear so the assistant can hear and respond clearly. That balance matters even more in a privacy-focused build, because we want the assistant to stay useful without leaning on cloud services.
The heart of the system is the computer itself, and this is where many beginners overthink the problem. A modern CPU, or central processing unit, is the main brain of the machine, and for many local projects a current 4-core to 8-core chip is a solid starting point. If you plan to run smaller language models and speech tools, 16 GB of RAM, which is the short-term working space your computer uses, can get you started; 32 GB gives you more breathing room. A fast SSD, or solid-state drive, matters too because it stores the model files and loads them quickly, which keeps the assistant from feeling sluggish.
If you want the local voice assistant to feel responsive, the next question is whether you need a GPU. A GPU, or graphics processing unit, is a chip that can handle many calculations at once, and it helps a lot when you run larger AI models locally. You do not need one for every build, though. For a lightweight setup, a good CPU and enough RAM can carry the load; for a smoother experience with larger models, a GPU with enough video memory can make the difference between waiting and conversing. Think of it like choosing between a bicycle and an electric bike for a hill: both work, but one asks much less of you.
Audio hardware deserves more attention than people often give it, because your assistant only feels smart if it can understand you. A clean USB microphone often beats a flashy laptop mic, and a small microphone array, which is a group of microphones working together, can help the system pick out your voice in a noisy room. The speaker matters too, but not because it needs to be expensive; it needs to be clear, so the assistant’s replies sound natural instead of muddy. If you are building for a desk, a simple microphone-and-speaker pair may be enough, while a living-room setup benefits from wider pickup and stronger output.
Once the core pieces are chosen, think about the physical shape of the machine. A mini PC, which is a compact desktop computer, can be a great fit if you want low power use and a tidy footprint. A repurposed desktop gives you more expansion room, more cooling, and often better value if you already own one. If you choose a small case, pay attention to heat, because local AI inference, the process where a model makes predictions, can push hardware harder than ordinary browsing or email. Good airflow is not glamorous, but it keeps the assistant dependable over long sessions.
It also helps to plan for privacy at the hardware level, not only in software. A wired Ethernet connection, which is a physical network cable, can be more stable than Wi-Fi and gives you one more way to keep the system predictable. Some people even dedicate one machine to the assistant so personal files, games, and everyday distractions stay separate from the voice stack. That kind of local hardware setup makes the whole project feel calmer and more intentional, because the computer becomes a tool with a job instead of a general-purpose box doing everything at once. From here, the next step is choosing the speech and model software that can make this hardware come alive.
Install Offline Voice Components
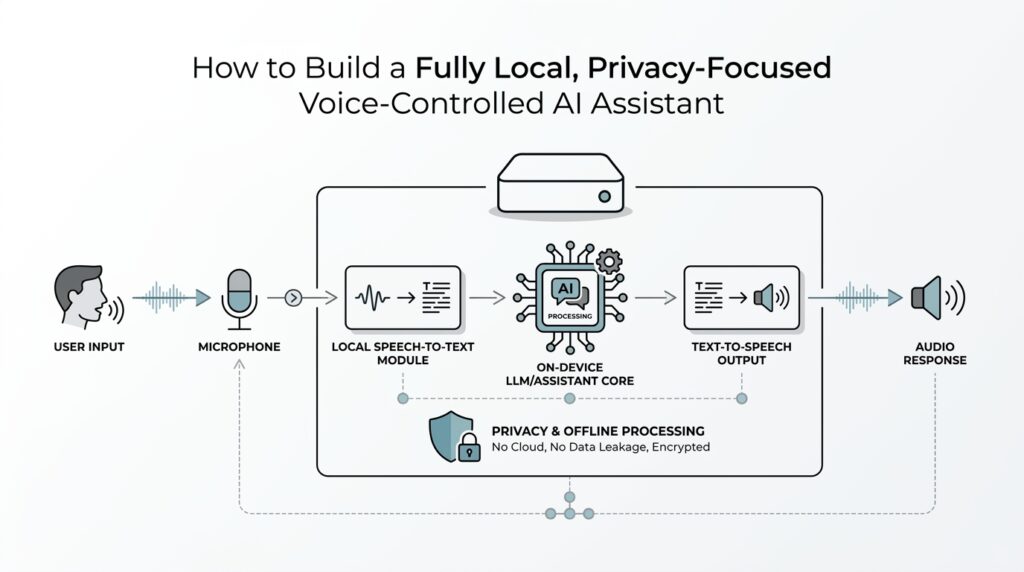
You’ve already picked the machine; now we get to give it a voice. Installing offline voice components is the moment your local voice assistant stops being a quiet box of hardware and starts becoming something that can listen, think, and answer without sending your words to the cloud. If you’ve been wondering, how do I install offline voice components for a local voice assistant?, the answer is to build the speech stack in small, understandable layers: wake word detection, speech-to-text, text-to-speech, and the glue that connects them.
The first layer is the wake word detector, which is the part that listens for a chosen phrase like “Hey Assistant” before doing any heavier work. Think of it like a doorbell with a very patient guard behind it; it stays alert, but it does not open the door for every passing sound. Installing this piece early matters because it saves CPU power, reduces background noise problems, and keeps your local voice assistant from trying to process every cough, conversation, or television line in the room. You want the system to wake up on purpose, not by accident.
Next comes speech-to-text, often shortened to STT, which means turning spoken words into written text. This is where your assistant begins to understand you in a practical way, and it is usually the most important part of the offline voice components puzzle. When you install a local speech-to-text engine, you are choosing how your assistant hears the world, so aim for something that can run on your hardware without leaning on internet requests. Some setups work best with a Python environment, which is a managed space for running code and installing libraries, while others use ready-made packages or containers, which are prepackaged software bundles that keep dependencies tidy.
After that, we bring in text-to-speech, or TTS, which turns the assistant’s written reply back into spoken sound. This part is like giving the system a friendly voice instead of leaving it to display text on a screen. A good offline voice assistant does not need a theatrical robot tone; it needs a clear, calm voice that is easy to understand over a desk, across a room, or in a busy house. When you install TTS locally, try to keep the same practical mindset you used with the microphone: clarity first, sparkle second.
Now the pieces have to meet in the middle, and this is where many beginners feel the project become real. The wake word detector hands audio to speech-to-text, speech-to-text returns plain text, the assistant logic decides what to do, and text-to-speech speaks the response aloud. That chain is the heart of a local voice assistant, and it works best when each part stays narrow and dependable. If one piece feels slow, it helps to test it on its own before moving to the next, because a quiet failure in one layer can look like a problem everywhere else.
Installation also means paying attention to the small things that make offline voice components feel stable instead of fragile. Audio drivers, which are the software that helps your operating system talk to your microphone and speaker, need to be recognized correctly before anything else can shine. File permissions, which control what the assistant is allowed to read or save, matter too if you want the system to store recordings, logs, or model files on your machine. These details are not glamorous, but they are the seams that hold the whole project together, especially when you want a privacy-focused build that stays local from end to end.
As you install and test each piece, remember that you are not building a single app so much as a small conversation pipeline. That mindset keeps the work manageable, because you can ask one question at a time: does the wake word fire, does the speech-to-text engine hear me, does the text-to-speech voice sound clear? Once those answers are yes, the offline voice components stop feeling abstract and start behaving like a real assistant. From here, the next step is to connect that speech layer to the reasoning model that will decide what your assistant should say and do.
Configure Wake Word Detection
Now that the audio stack is in place, we can give your assistant the tiny spark that makes it feel alive. Wake word detection is the part that keeps listening for a chosen phrase like “Hey Assistant” and ignores everything else until it hears the signal. If you’ve ever wondered, how do I configure wake word detection for a local voice assistant?, the answer starts with one simple idea: you want the system alert enough to notice you, but quiet enough not to react to every stray sound in the room.
The first choice is the wake phrase itself, and this is where a little restraint pays off. A good phrase is short, distinct, and unlikely to appear in ordinary conversation, because the assistant needs to tell your command apart from the background chatter of daily life. You can think of it like choosing a unique doorbell chime in a busy apartment building; the more it stands out, the less often you get false alerts. In a privacy-focused build, that matters even more, because a reliable local wake word detector means fewer accidental recordings and less unnecessary processing.
After the phrase comes the detector model, which is the small piece of software trained to recognize that phrase in live audio. Some wake word systems run continuously on the CPU, or central processing unit, which is the main processor in your computer, while others are tuned to use less memory and power. For a local voice assistant, the best choice is usually the one that can stay awake all day without making the machine feel sluggish. We are not chasing the fanciest model here; we are looking for the one that hears your phrase cleanly and stays out of the way the rest of the time.
This is also the point where microphone placement starts to matter more than people expect. If the mic sits too close to a fan, speaker, or keyboard, the detector will spend its energy listening to noise that never belonged to a human voice in the first place. A steady placement on a desk, away from constant hums, usually gives you a much calmer starting point. Wake word detection works best when the input is predictable, because the software can only identify your phrase if the sound arriving at the microphone is reasonably clean.
Once the detector is chosen, you usually tune its sensitivity, which is the threshold that decides how easily it should wake up. Set it too high, and the assistant may miss you when you speak softly; set it too low, and it may wake up from a TV line or a nearby conversation. This tuning step is a little like adjusting a smoke detector during cooking season: you want enough awareness to catch the real event without triggering on every harmless puff. A good local voice assistant often needs a few rounds of testing before the balance feels right.
Then comes the part where the wake word detector hands the baton to the rest of the system. It listens in the background, and when it hears the chosen phrase, it passes the next few seconds of speech to speech-to-text, or STT, which turns spoken words into written text. That handoff should feel smooth, because a delay between the wake phrase and the assistant’s response can make the whole experience feel awkward. When wake word detection is configured well, the assistant feels ready without feeling intrusive.
Testing is where the configuration stops being abstract and starts behaving like a real tool in your home. Speak the wake phrase from different distances, at a normal volume, and then again with background noise playing softly in the room so you can see how the system behaves in everyday conditions. If you notice frequent false wakes, tighten the threshold or choose a more distinctive phrase; if the assistant misses you, relax the threshold or improve the microphone setup. That back-and-forth is normal, and it is part of shaping wake word detection into something that feels dependable rather than temperamental.
A small but important habit is to keep the wake listener separate from the heavier parts of your assistant. The always-on detector should do one job well: wait for the phrase and wake the system only when needed. That separation protects performance, keeps the local voice assistant responsive, and supports the privacy-minded goal of processing only what you intend to say. Once this layer feels stable, the rest of the conversation pipeline can build on it with much less friction.
Add Local Speech Recognition
The first time you add local speech recognition, it can feel a little like teaching your assistant how to listen at the front door without inviting the whole neighborhood inside. That is the promise here: your voice becomes text on your own machine, not in a cloud service, and the assistant can stay private from the start. If you’ve been asking, how do I add local speech recognition to a voice assistant?, we begin with the core idea that this layer is often called speech-to-text or automatic speech recognition (ASR), which means turning spoken audio into written words. Projects like whisper.cpp and Vosk are built for exactly this kind of offline, on-device recognition.
Once that idea clicks, the next choice is the engine that will do the listening. A local speech recognition engine needs to run fast enough to keep pace with your speech, but it also needs to stay inside your hardware limits so the rest of the assistant can breathe. Whisper.cpp is designed for high-performance on-device inference, while Vosk is built for offline speech recognition with a streaming API, which makes it a strong fit when you want recognition that feels immediate instead of delayed. In plain language, whisper-style setups often shine when you want strong transcription quality, while streaming engines are helpful when you want the text to appear as you speak.
Then we reach the part that makes the system feel real: audio does not arrive as a perfect sentence, it arrives as a moving stream. Your assistant has to decide where one thought ends and the next begins, and that is why many local speech recognition setups work better when they process short chunks of sound or a live stream rather than waiting for a long recording to finish. Vosk’s streaming API is explicitly built for continuous recognition, and its small model sizes are meant to keep the system light enough for everyday devices. Whisper.cpp, meanwhile, keeps the model files local and lets you run the transcription entirely on your own hardware.
This is also where you start shaping the assistant around your actual words, not just generic speech. Home assistants often need to recognize names, room labels, app names, and other words that do not appear often in everyday conversation, so a local speech recognition setup should give you a way to favor the vocabulary you care about. Vosk supports reconfigurable vocabulary and even speaker identification, which can help in projects that need a more customized listening experience. That flexibility matters because the best transcription engine is not only accurate in a vacuum; it is accurate in your home, with your habits, and your vocabulary.
As you wire this layer into the rest of the assistant, it helps to think in a simple sequence. The wake word detector hands off a short stretch of audio, local speech recognition turns that audio into text, and then the reasoning layer decides what the assistant should do next. That handoff should feel smooth, because if transcription lags, the whole conversation starts to feel like it is walking through mud. The good news is that this is one of the cleanest places to keep your privacy story intact: the sound stays local, the transcript stays local, and the assistant only passes text to the next step after it has already done its listening on your machine.
When you test it, start with the kind of speech you actually use, not polished microphone speech. Speak a few short commands, try a longer sentence, then repeat the same phrase at a normal pace and at a softer pace so you can see where the engine gets confident and where it hesitates. If the assistant misses words, you usually have three levers to pull: a larger model, a cleaner microphone signal, or a more patient streaming setup. That is the real rhythm of building local speech recognition for a voice assistant; we listen, we tune, and then we listen again until the machine feels less like software and more like a calm partner in the room.
Connect Intent Handling And Automations
Now the assistant has heard you and turned your words into text, but it still needs to answer a very practical question: what do those words mean? This is where intent handling enters the story, and it is the bridge between raw speech and useful action. In a local voice assistant, an intent is the user’s goal, like turning on a light, opening a note, or setting a timer, and the intent handler is the part that matches your sentence to that goal. Without this step, the assistant can listen perfectly and still feel helpless, like a librarian who hears your request but never walks you to the right shelf.
The easiest way to picture intent handling is to think of it as sorting mail. Your speech-to-text engine drops a written sentence on the table, and intent handling looks at it, decides whether it is a command, a question, or a casual remark, and then routes it to the right place. For example, “turn off the kitchen lights” and “what time is it?” both sound simple, but they belong to different pathways because they need different results. That little bit of classification is what makes a local voice assistant feel organized instead of random.
Once we start building that system, we usually define a few clear intents, which are named categories for actions your assistant can perform. Each intent often has slots, meaning the specific pieces of information inside the request, such as a room name, a number, or a reminder time. So in “set a timer for ten minutes,” the intent is timer creation, while “ten minutes” is the slot the assistant must extract. This step matters because intent handling is not about memorizing whole sentences; it is about learning the shape of the request so the assistant can respond flexibly to different wording.
A good voice assistant automation setup keeps those shapes small and sensible. If you try to teach the assistant everything at once, it becomes harder to test and harder to trust, so it helps to begin with a handful of common tasks you actually use every day. That might mean lights, reminders, media playback, or a home status check, and each one becomes a separate automation path. You can think of these paths like labeled tracks on a train station board: the same incoming speech can leave in different directions, but only after the system recognizes the right destination.
So how do we connect the intent to the action? In a local setup, the intent handler usually calls a small function, script, or home automation service that performs the work on your machine or network. If the assistant hears “start the coffee maker,” the handler can send that command to a local device controller; if it hears “remind me at 7,” it can save the reminder in your local calendar or notes. This is the heart of voice assistant automation: the assistant stops being a translator and becomes a dispatcher, sending each request to the right tool while keeping the whole process inside your own system.
At this stage, the most important design habit is to separate understanding from doing. The intent layer should decide what the user wants, while the automation layer decides how to carry it out. That split makes the system easier to repair when something goes wrong, because you can tell whether the assistant misunderstood the sentence or whether the device action failed. It also gives you a cleaner privacy story, since your commands, your rules, and your automations can all stay on local hardware instead of being handed off to outside services.
As you test this connection, speak the same request in a few different ways and watch whether the assistant still chooses the same intent. That flexibility is what makes a local voice assistant feel natural, because real people do not repeat themselves like a script. When the intent handling is solid and the automations are reliable, the assistant begins to feel less like a demo and more like a helpful roommate who understands what you mean and knows exactly where to send it next.
Test Privacy, Latency, And Accuracy
Now that the assistant can listen, understand, and trigger actions, we reach the moment that separates a clever demo from something you can trust every day: we test privacy, latency, and accuracy. If you’ve been asking, how do you test a local voice assistant for privacy, latency, and accuracy?, the answer is to treat those three goals like three doors in the same hallway. Privacy asks where the data goes, latency asks how long the trip takes, and accuracy asks whether the right message arrived intact. A local voice assistant should feel calm and predictable here, not mysterious.
Privacy testing starts with the simplest question of all: is anything leaving the machine when it should not? The first check is to disconnect the network and see whether the assistant still works for the tasks it is supposed to handle. That offline test tells you whether the system truly depends on the cloud or whether it can stand on its own, which is the whole point of a privacy-focused build. Then we look at logs, cache files, and temporary audio recordings, because a system can be “offline” in spirit but still leave more traces on disk than you expected.
It also helps to watch the network traffic while the assistant runs. A packet monitor is a tool that shows what your computer sends and receives, and it can reveal whether a speech request is quietly reaching outside services. This step matters because privacy is not only about intention; it is about proof. If you are building a local voice assistant for your home, you want to know that wake words, transcripts, and commands stay inside your walls unless you have explicitly chosen otherwise.
Latency is the next piece of the puzzle, and it is the one users feel most directly. Latency means the delay between your spoken command and the assistant’s response, and even a small delay can make the system feel hesitant. To measure it, speak a wake phrase, start a simple timer, and note when the assistant begins replying. Then test the same command several times, because one quick response can hide a slower average. A good local voice assistant should feel like it is listening with you, not thinking from the other side of a long tunnel.
When latency feels too high, the trick is to find which stage is slowing things down. Sometimes the wake word detector reacts quickly, but speech-to-text needs more time. Sometimes transcription is fast, but the reasoning layer pauses before it chooses an action. Sometimes the reply itself is ready, but text-to-speech takes a moment to speak it aloud. Breaking the path into pieces gives us a clearer picture, and that is much kinder than blaming the whole system for one bottleneck.
Accuracy asks a different kind of question: did the assistant hear the right words, and did it choose the right meaning? This is where we test the local speech recognition engine with short commands, longer sentences, background noise, and different speaking speeds. Try the phrases you will actually use in daily life, because a model that performs well on polished test lines can stumble on ordinary household speech. Accuracy in a privacy-focused setup is not about perfect transcription on paper; it is about reliable understanding in your real room, with your real voice.
It is worth testing more than one kind of accuracy, because a transcript can look good and still produce the wrong result. The speech-to-text layer may capture the words correctly, but the intent handler might misread the request and launch the wrong automation. That is why we test both the text output and the action that follows it. When the assistant hears “turn on the lamp,” we want the lamp to respond, not just the transcript to look neat.
The best testing routine is small, repeatable, and a little bit boring, which is exactly what makes it useful. Run the same privacy check, the same response-time check, and the same accuracy phrases after each change, so you can tell whether a tweak helped or hurt. Over time, this turns your local voice assistant into something dependable: private because you verified it, fast because you measured it, and accurate because you listened closely enough to see where it needed work.